Understanding and Disabling Secure Boot in Windows 11: A Comprehensive Guide
Related Articles: Understanding and Disabling Secure Boot in Windows 11: A Comprehensive Guide
Introduction
With great pleasure, we will explore the intriguing topic related to Understanding and Disabling Secure Boot in Windows 11: A Comprehensive Guide. Let’s weave interesting information and offer fresh perspectives to the readers.
Table of Content
Understanding and Disabling Secure Boot in Windows 11: A Comprehensive Guide

Secure Boot, a crucial security feature introduced with UEFI (Unified Extensible Firmware Interface), is designed to protect your computer from malicious software during the boot process. It ensures that only trusted operating systems and drivers can load, significantly reducing the risk of malware infections. While Secure Boot offers robust protection, there are specific scenarios where disabling it might be necessary. This comprehensive guide will delve into the intricacies of Secure Boot, its benefits, and the potential reasons for disabling it in Windows 11.
The Essence of Secure Boot:
Secure Boot operates by verifying the digital signature of the operating system and drivers during the boot process. Only software with a valid signature from a trusted authority, like Microsoft, can load, preventing the execution of unauthorized or potentially harmful code. This layered security approach forms a critical line of defense against boot-time attacks, which can compromise the entire system before the operating system even loads.
Benefits of Secure Boot:
- Enhanced System Security: By verifying the authenticity of the operating system and drivers, Secure Boot effectively prevents the loading of malicious software, including rootkits and boot sector viruses.
- Reduced Vulnerability to Attacks: The use of digital signatures and trusted sources makes it significantly harder for attackers to exploit vulnerabilities in the boot process.
- System Integrity Protection: Secure Boot safeguards the system from unauthorized modifications, ensuring that the operating system and essential drivers remain intact and trustworthy.
- Improved Boot Process: Secure Boot often contributes to a faster and smoother boot experience by eliminating the need for unnecessary checks and verifications.
Why Disable Secure Boot?
While Secure Boot is generally beneficial, there are specific scenarios where disabling it might be necessary:
- Legacy Hardware Compatibility: Older hardware, especially legacy peripherals and drivers, might not be compatible with Secure Boot. Disabling it allows these components to function properly.
- Dual Boot Environments: Setting up a dual boot system with multiple operating systems often requires disabling Secure Boot on one or both operating systems.
- Specialized Operating Systems: Certain operating systems, like Linux distributions, might not have Secure Boot support or might require specific configurations that necessitate disabling Secure Boot.
- Advanced Users and System Customization: Some users might require disabling Secure Boot for advanced system customizations or to utilize specific software or utilities that are not compatible with Secure Boot.
Disabling Secure Boot in Windows 11: A Step-by-Step Guide:
Disabling Secure Boot in Windows 11 requires accessing the BIOS or UEFI settings of your computer. The exact steps might vary depending on the manufacturer and motherboard model. However, the general procedure is as follows:
-
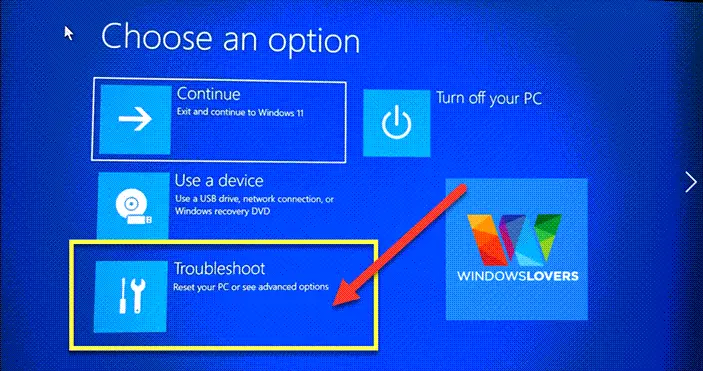
Access the BIOS/UEFI Settings:
- Restart your computer and press the appropriate key during the boot process. The specific key (often F2, F10, Del, or Esc) is usually displayed on the screen.
- Navigate to the BIOS or UEFI settings menu.
-
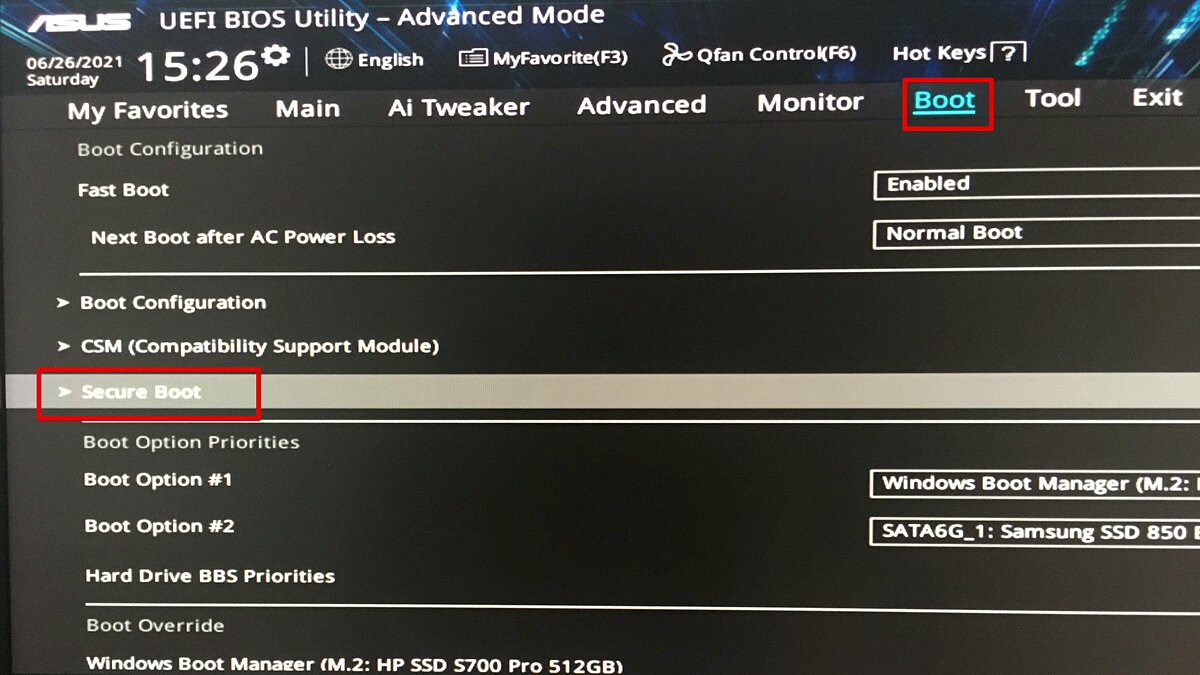
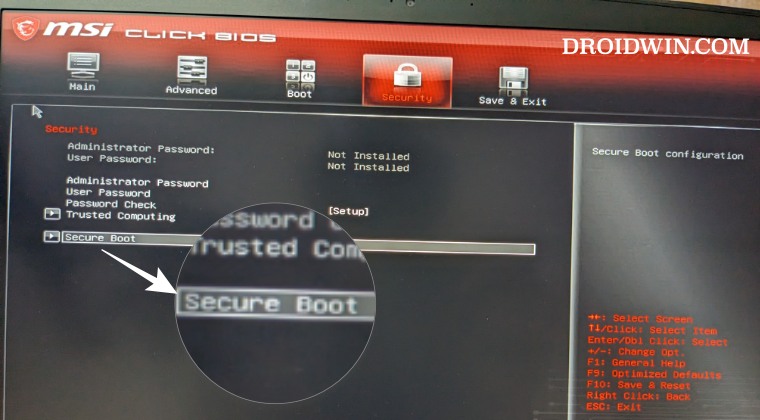
Locate the Secure Boot Option:
- Look for a section labeled "Boot," "Security," or "System Configuration."
- Within this section, you should find an option related to Secure Boot. It might be called "Secure Boot," "Secure Boot Control," or "UEFI Secure Boot."
-
Disable Secure Boot:
- Select the Secure Boot option and change its value to "Disabled," "Off," or "Legacy."
- Save the changes and exit the BIOS/UEFI settings.
-
Restart your Computer:
- Your computer will restart, and Windows 11 should boot without Secure Boot enabled.
Important Considerations:
- Manufacturer’s Documentation: Consult the manufacturer’s documentation for your specific computer model to get precise instructions on accessing the BIOS/UEFI settings and disabling Secure Boot.
- System Stability: Disabling Secure Boot can potentially impact system stability, especially if the system relies heavily on Secure Boot for security.
- Data Security: Disabling Secure Boot can increase the vulnerability of your system to malware. Ensure you have strong antivirus protection and other security measures in place.
- Re-enabling Secure Boot: If you later decide to re-enable Secure Boot, follow the same steps outlined above but change the Secure Boot option back to "Enabled."
FAQs on Disabling Secure Boot in Windows 11:
Q: Is it safe to disable Secure Boot in Windows 11?
A: Disabling Secure Boot can compromise the security of your system, making it more susceptible to malware. It is generally recommended to keep Secure Boot enabled unless you have a specific reason to disable it.
Q: What happens if I disable Secure Boot and then try to install Windows 11?
A: Windows 11 requires Secure Boot to be enabled for installation. You will not be able to install Windows 11 with Secure Boot disabled.
Q: Can I disable Secure Boot for a specific operating system in a dual boot environment?
A: Yes, you can disable Secure Boot for a specific operating system in a dual boot environment. However, you need to configure the boot order and settings accordingly to ensure that the operating system without Secure Boot can load properly.
Q: Will disabling Secure Boot affect the performance of my computer?
A: Disabling Secure Boot might slightly improve boot times, but it is unlikely to have a significant impact on overall performance.
Tips for Disabling Secure Boot in Windows 11:
- Backup Your Data: Before making any changes to your system’s BIOS/UEFI settings, it is always recommended to back up your important data to avoid data loss.
- Consult Manufacturer’s Documentation: Refer to the manufacturer’s documentation for your specific computer model to get precise instructions on accessing the BIOS/UEFI settings and disabling Secure Boot.
- Understand the Risks: Disabling Secure Boot can increase the vulnerability of your system to malware. Ensure you have strong antivirus protection and other security measures in place.
- Consider the Alternatives: Before disabling Secure Boot, explore alternative solutions, such as updating drivers, using compatible hardware, or configuring Secure Boot settings to accommodate your specific needs.
Conclusion:
Secure Boot is an essential security feature in Windows 11, providing robust protection against malware and boot-time attacks. While disabling Secure Boot might be necessary in certain scenarios, it is crucial to understand the associated risks and take appropriate security measures. Always consult manufacturer’s documentation and proceed with caution when making changes to your system’s BIOS/UEFI settings. By carefully considering the potential benefits and drawbacks, you can make an informed decision about whether to disable Secure Boot in your Windows 11 environment.
![How to Disable or Enable Secure Boot on Windows 10 and 11 Learn [Solve IT]](https://i0.wp.com/techdirectarchive.com/wp-content/uploads/2021/12/Secure-boot-enabled-Windows-11.jpg?ssl=1)


Closure
Thus, we hope this article has provided valuable insights into Understanding and Disabling Secure Boot in Windows 11: A Comprehensive Guide. We hope you find this article informative and beneficial. See you in our next article!