Securing Your Windows 11 System: A Guide to Enabling Secure Boot
Related Articles: Securing Your Windows 11 System: A Guide to Enabling Secure Boot
Introduction
In this auspicious occasion, we are delighted to delve into the intriguing topic related to Securing Your Windows 11 System: A Guide to Enabling Secure Boot. Let’s weave interesting information and offer fresh perspectives to the readers.
Table of Content
Securing Your Windows 11 System: A Guide to Enabling Secure Boot

In the contemporary landscape of computing, where security threats are ever-evolving and increasingly sophisticated, safeguarding one’s digital assets is paramount. Windows 11, Microsoft’s latest operating system, introduces a robust security feature known as Secure Boot, designed to protect users from malicious software and unauthorized modifications to the system’s core functionality.
This article provides a comprehensive guide on enabling Secure Boot in Windows 11, outlining the steps involved and illuminating the vital role it plays in bolstering system security.
Understanding Secure Boot: A Bastion Against Malicious Intrusions
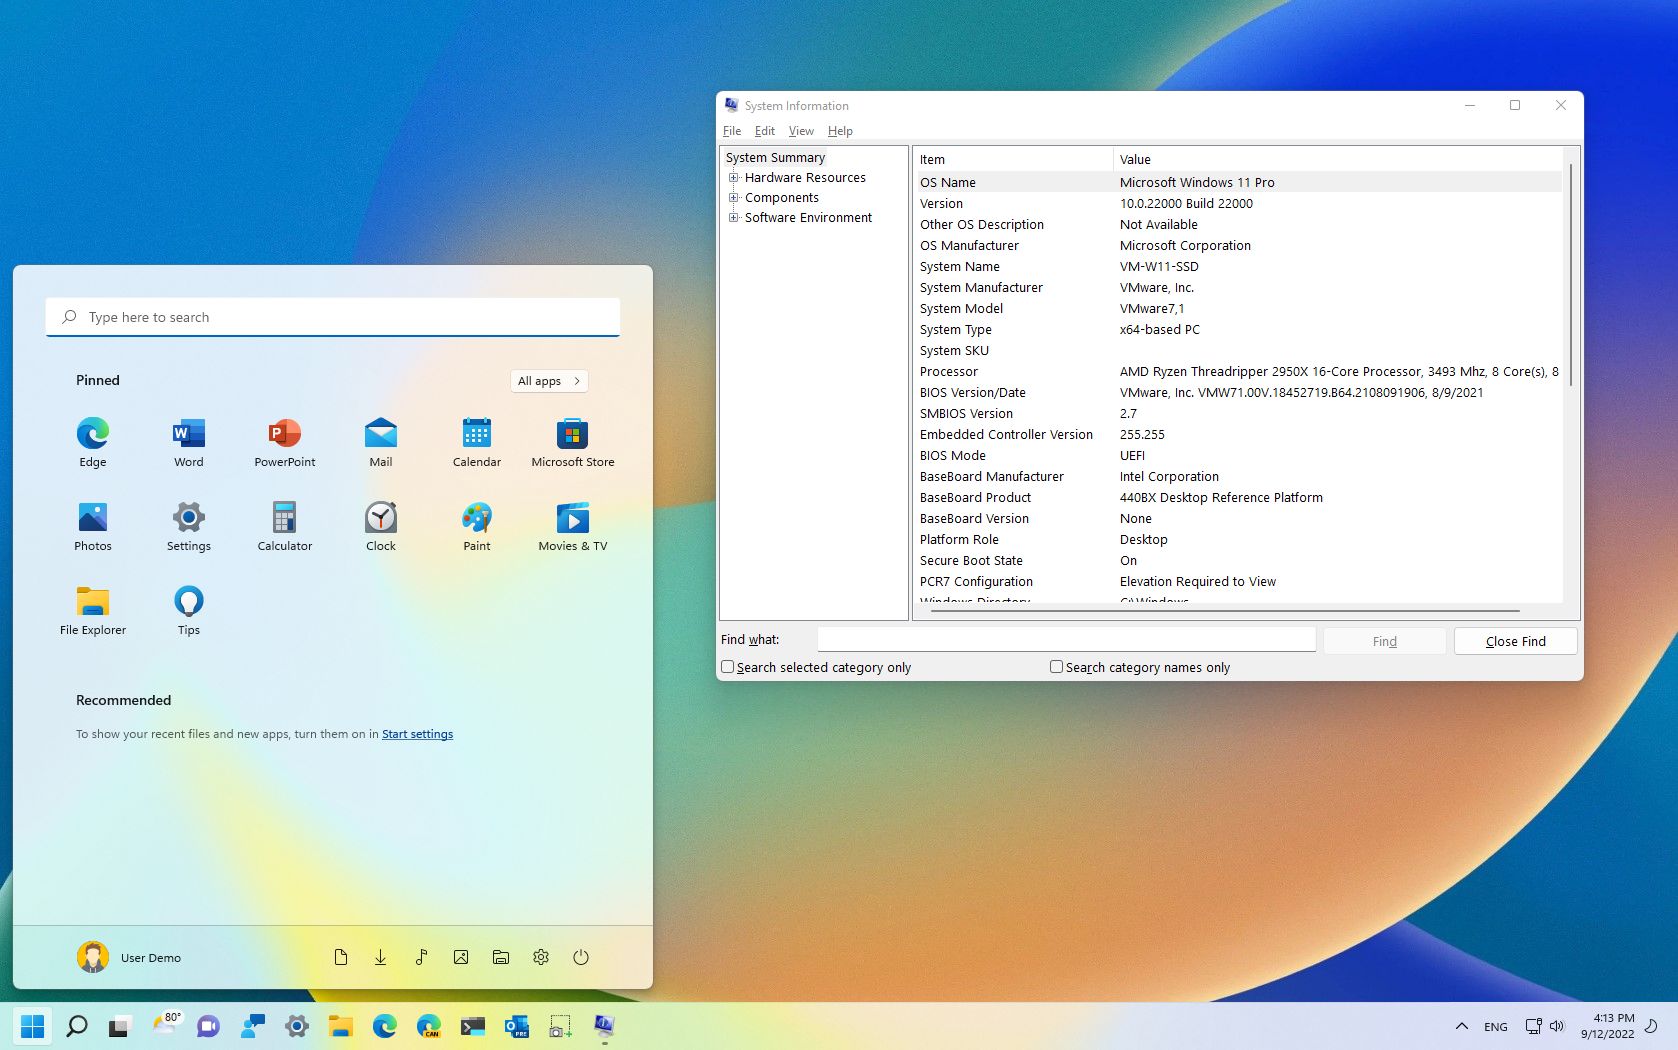
Secure Boot acts as a digital gatekeeper, ensuring that only trusted software, verified by a digital signature, is allowed to load and execute during the boot process. It accomplishes this by scrutinizing the digital signatures of the operating system and all other boot components, preventing unauthorized modifications or the introduction of malware that could compromise the system’s integrity.
The Benefits of Enabling Secure Boot:
- Enhanced System Integrity: Secure Boot safeguards the system’s core functionalities by preventing unauthorized modifications, ensuring the system boots with trusted components.
- Protection Against Malware: By verifying the digital signatures of all boot components, Secure Boot effectively blocks malware from loading and executing during the boot process.
- Increased System Stability: Secure Boot contributes to a more stable and reliable system by preventing unauthorized modifications that could introduce instability or errors.
- Compliance with Security Standards: Many organizations and security standards, such as the Trusted Platform Module (TPM) 2.0, mandate the use of Secure Boot for enhanced security.
Prerequisites for Enabling Secure Boot:
Before embarking on the process of enabling Secure Boot, it is essential to ensure the following prerequisites are met:
- Compatible Hardware: The system must possess a UEFI (Unified Extensible Firmware Interface) firmware that supports Secure Boot. Most modern systems released after 2012 are likely to have this capability.
- UEFI Firmware Settings: The UEFI firmware must be configured to allow Secure Boot. This setting is typically found within the BIOS or UEFI settings, accessible by pressing a specific key during the boot process (often F2, F10, or Delete).
- Windows 11 Compatibility: Windows 11 requires a system with a TPM 2.0 module and Secure Boot enabled.
Enabling Secure Boot in Windows 11: A Step-by-Step Guide
-
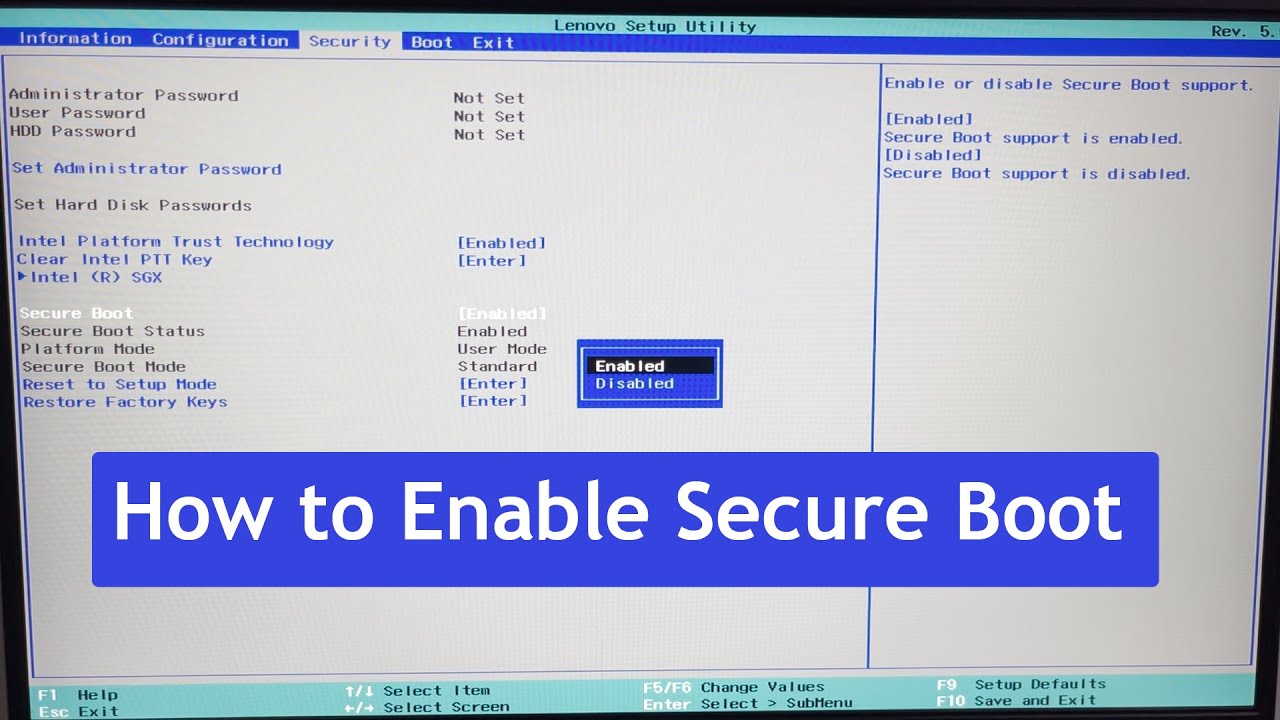
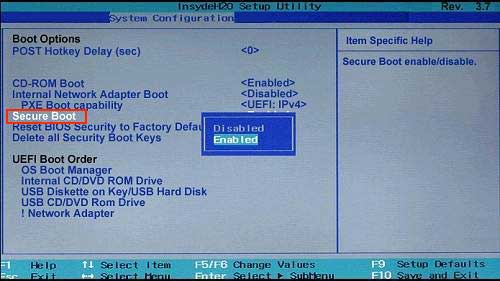
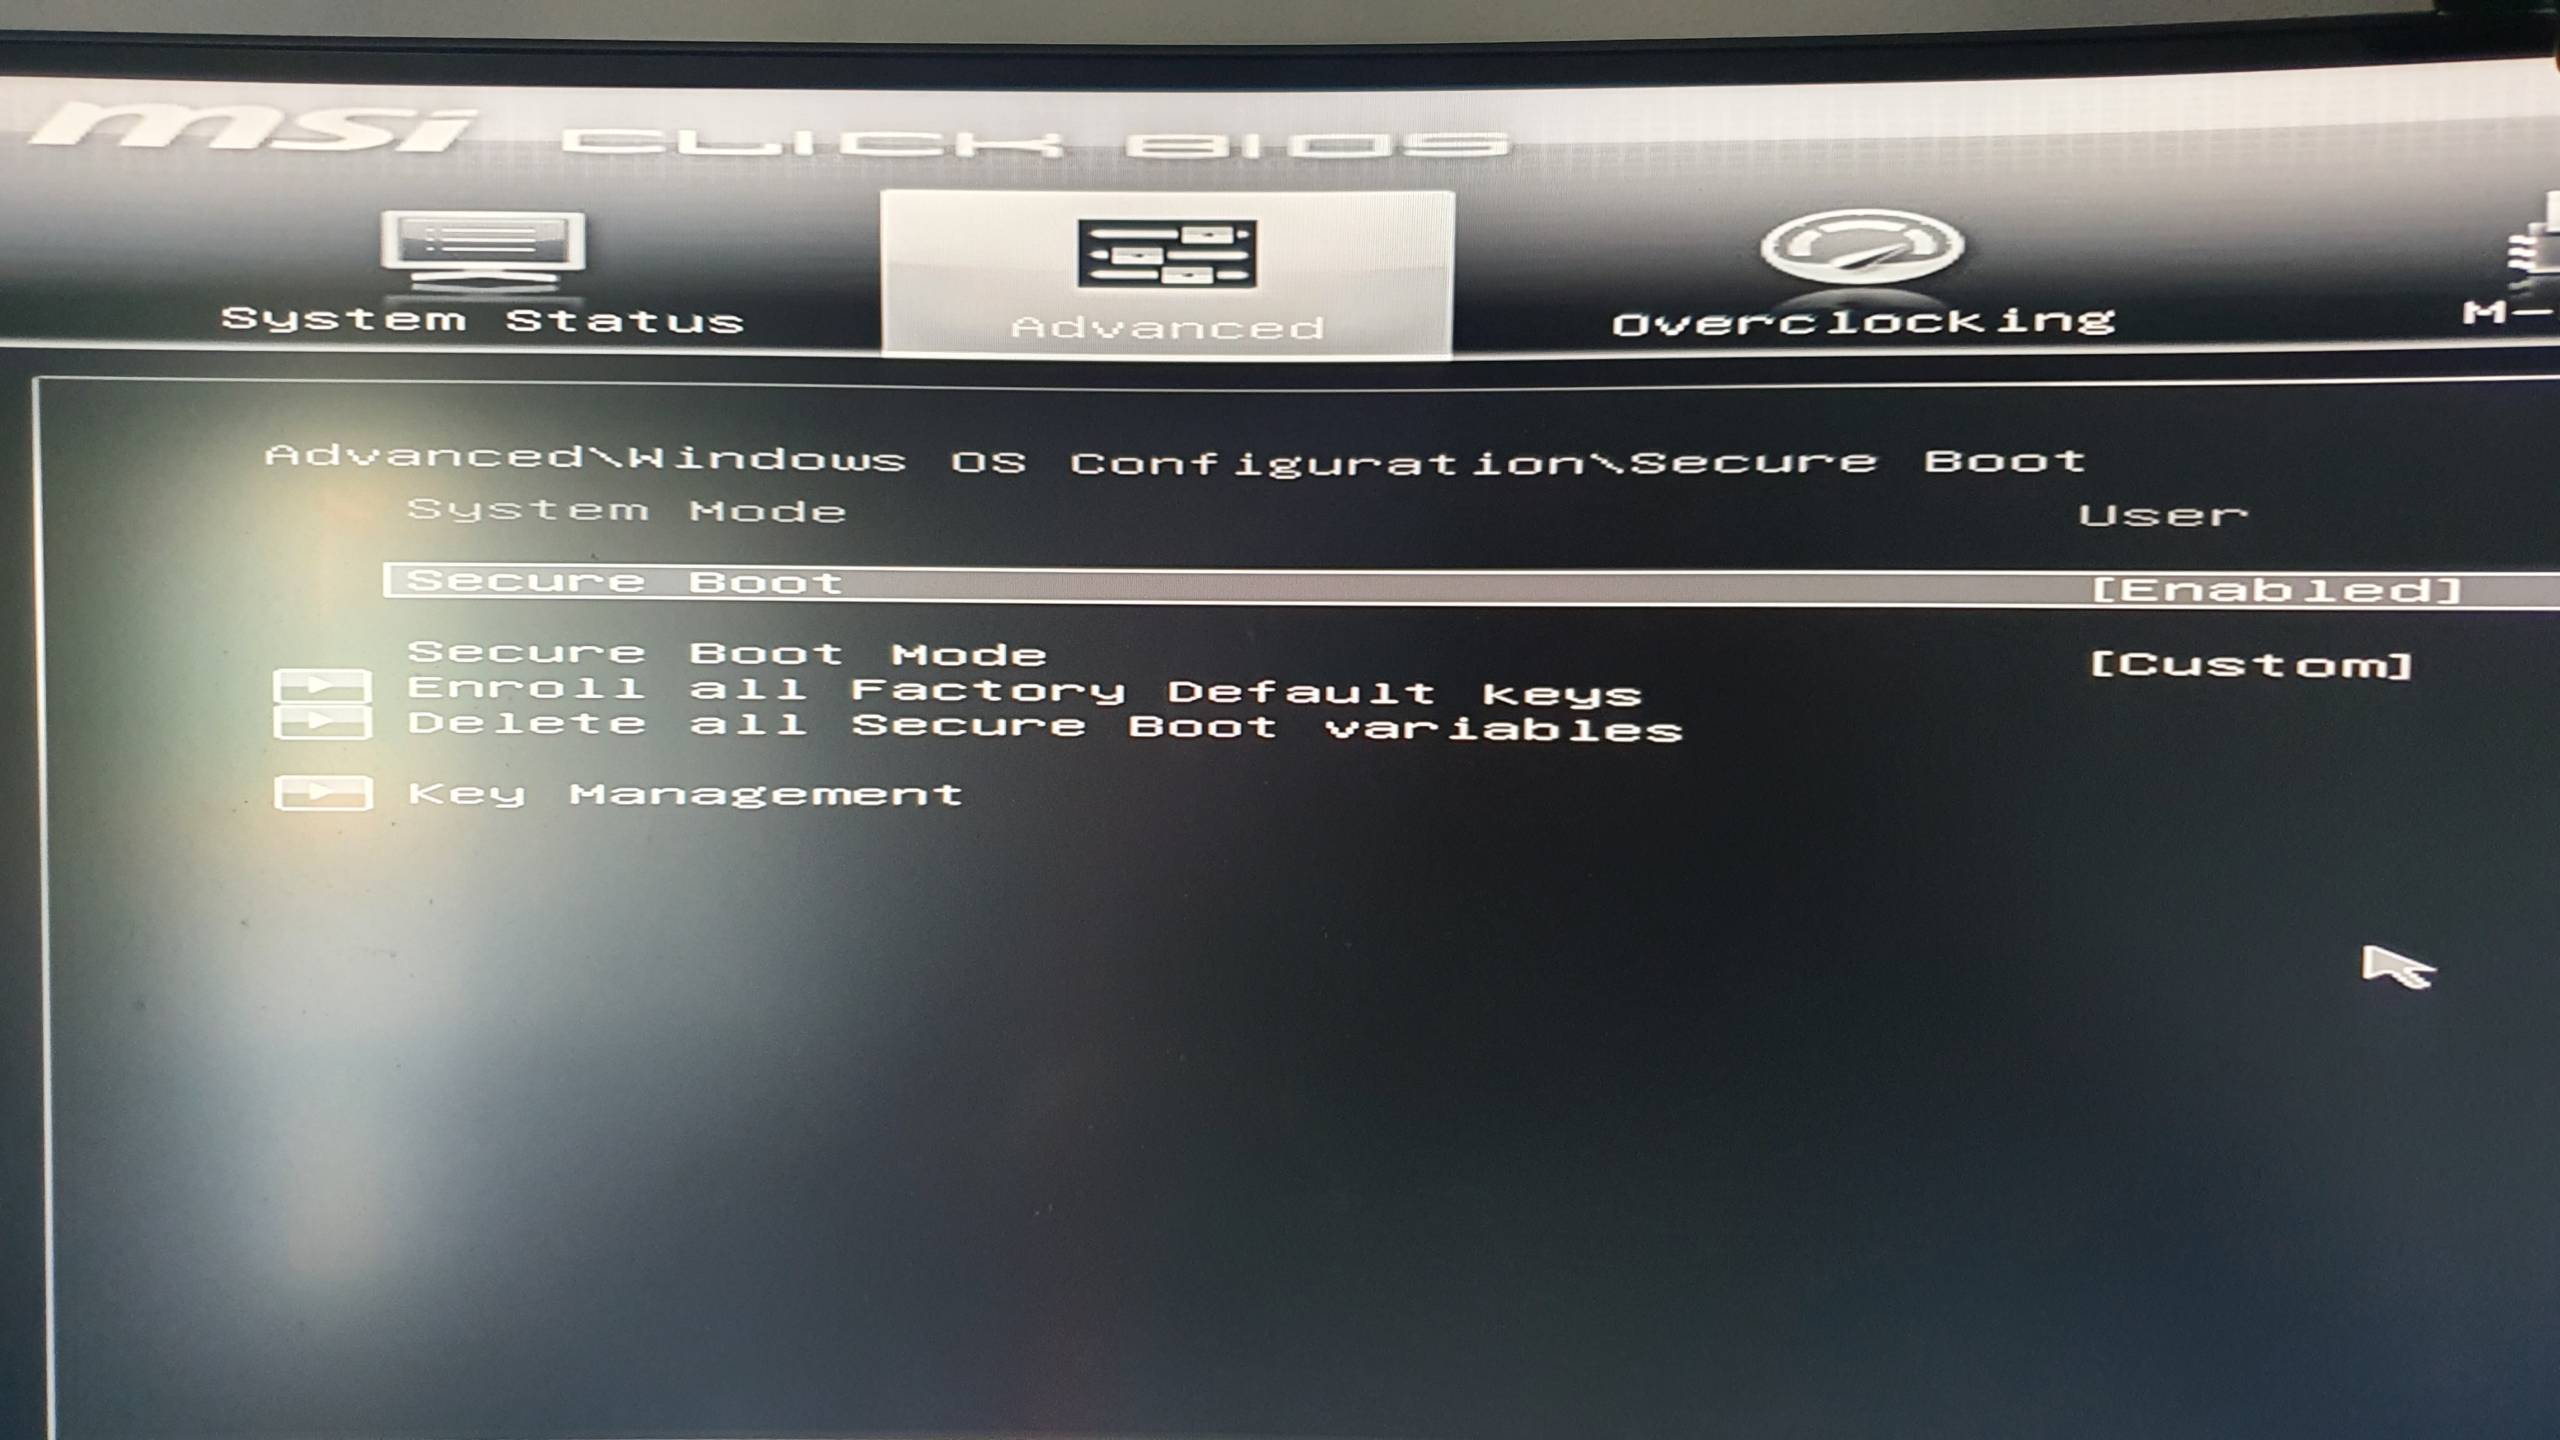
Accessing the UEFI Firmware Settings:
- Restart the computer and press the designated key (F2, F10, Delete, or another key specific to the system’s motherboard) to enter the UEFI firmware settings.
- Navigate to the "Security" or "Boot" section within the UEFI firmware settings.
-
Enabling Secure Boot:
- Locate the option for "Secure Boot" or "Secure Boot Control" within the UEFI settings.
- Enable the Secure Boot setting.
- Depending on the system’s firmware, there might be additional options to configure Secure Boot, such as selecting a specific Secure Boot key or enabling specific boot modes.
-
Saving Changes:
- Once Secure Boot is enabled, save the changes and exit the UEFI firmware settings.
- The system will restart, and Secure Boot will be active.
Troubleshooting Common Issues:
- Secure Boot Not Available: If Secure Boot is not available in the UEFI firmware settings, it might be disabled in the system’s BIOS or the system might not support Secure Boot. Consult the system’s documentation or contact the manufacturer for guidance.
- Secure Boot Disabled After Enabling: If Secure Boot becomes disabled after enabling it, ensure that the UEFI firmware settings are saved correctly and that there are no conflicting settings that might disable Secure Boot.
- System Unable to Boot After Enabling Secure Boot: If the system fails to boot after enabling Secure Boot, it might be due to an incompatibility with the operating system or boot components. In such cases, it might be necessary to revert the Secure Boot setting to its previous state or seek assistance from the system’s manufacturer or technical support.
FAQs: Addressing Common Questions about Secure Boot
Q: Is Secure Boot essential for all systems?
A: While Secure Boot is a crucial security feature, it is not always mandatory. However, for systems running Windows 11, Secure Boot is a requirement for compatibility and enhanced security.
Q: Can I disable Secure Boot after enabling it?
A: Yes, Secure Boot can be disabled by following the same steps used to enable it, but it is generally recommended to keep Secure Boot enabled for optimal security.
Q: Does enabling Secure Boot affect system performance?
A: Enabling Secure Boot does not significantly impact system performance. The added security measures are handled by the UEFI firmware and do not impose a substantial burden on the system’s resources.
Q: What are the risks of disabling Secure Boot?
A: Disabling Secure Boot exposes the system to potential security vulnerabilities, as it removes the protection against unauthorized software and malware during the boot process.
Q: Can I enable Secure Boot on an older system?
A: Secure Boot is primarily supported on modern systems with UEFI firmware. Older systems with BIOS firmware might not support Secure Boot.
Tips for Enhancing System Security with Secure Boot
- Keep the UEFI Firmware Up to Date: Regularly updating the UEFI firmware can enhance security by addressing vulnerabilities and introducing new features.
- Use a Trusted Operating System: Ensure that the operating system is from a trusted source and has a valid digital signature to ensure its integrity.
- Install Anti-Malware Software: Employ a reputable anti-malware solution to provide additional protection against malware and other threats.
- Practice Safe Computing Habits: Maintain good security practices, such as using strong passwords, avoiding suspicious websites, and keeping software updated.
Conclusion: A Secure Foundation for Digital Security
Enabling Secure Boot in Windows 11 is a crucial step towards bolstering system security, safeguarding against malicious threats and unauthorized modifications. By implementing this security feature, users can confidently navigate the digital landscape, knowing their systems are protected from potential vulnerabilities. By understanding the benefits, prerequisites, and steps involved in enabling Secure Boot, users can confidently take control of their system’s security and enjoy a more secure computing experience.


Closure
Thus, we hope this article has provided valuable insights into Securing Your Windows 11 System: A Guide to Enabling Secure Boot. We thank you for taking the time to read this article. See you in our next article!