Safeguarding Data: A Comprehensive Guide to Enabling Confirmation Dialogs in Windows 10
Related Articles: Safeguarding Data: A Comprehensive Guide to Enabling Confirmation Dialogs in Windows 10
Introduction
With enthusiasm, let’s navigate through the intriguing topic related to Safeguarding Data: A Comprehensive Guide to Enabling Confirmation Dialogs in Windows 10. Let’s weave interesting information and offer fresh perspectives to the readers.
Table of Content
Safeguarding Data: A Comprehensive Guide to Enabling Confirmation Dialogs in Windows 10

The accidental deletion of files can be a frustrating and potentially disastrous event, leading to lost data and wasted time. Windows 10, while a robust operating system, does not inherently include a confirmation prompt before deleting files. This can leave users vulnerable to unintentional data loss. Fortunately, enabling a confirmation dialog before deleting files is a simple process that can significantly enhance data security.
Understanding the Importance of Confirmation Dialogs
Confirmation dialogs, often referred to as "ask before delete" prompts, act as a crucial safeguard against accidental data deletion. By requiring user confirmation before deleting files, these dialogs provide an opportunity for users to reconsider their actions and potentially prevent the loss of valuable data. This is particularly important in situations where users may be working under pressure, distracted, or simply in a hurry.
Enabling Confirmation Dialogs in Windows 10
While Windows 10 does not offer a built-in "ask before delete" setting, there are alternative methods to achieve this functionality. These methods involve making changes to the operating system’s registry or utilizing third-party software solutions.
Method 1: Modifying the Registry
This method involves directly editing the Windows Registry, a powerful but potentially risky procedure. It is crucial to exercise caution and create a system restore point before proceeding, as incorrect modifications to the registry can cause system instability.
-
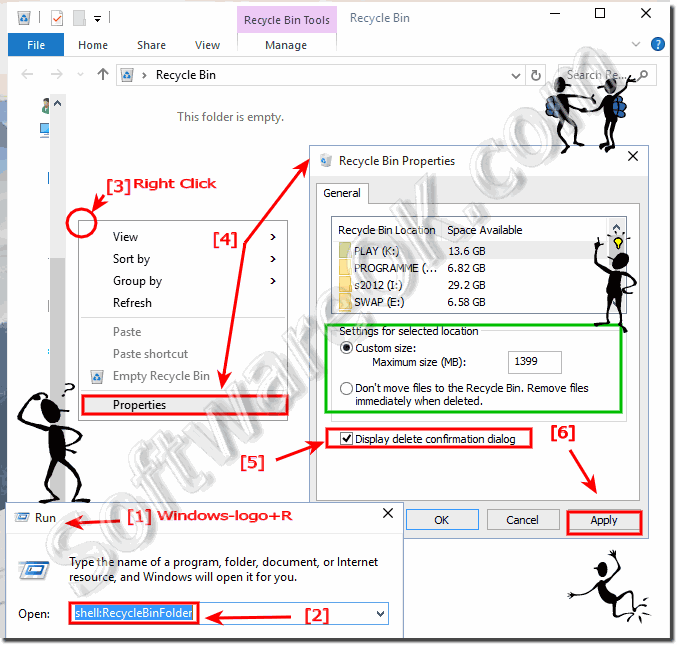
Access the Registry Editor: Press the "Windows" key and "R" simultaneously to open the "Run" dialog box. Type "regedit" and press "Enter."
-
Navigate to the Relevant Key: In the Registry Editor window, navigate to the following key:
HKEY_CURRENT_USERSoftwareMicrosoftWindowsCurrentVersionPoliciesExplorer
-
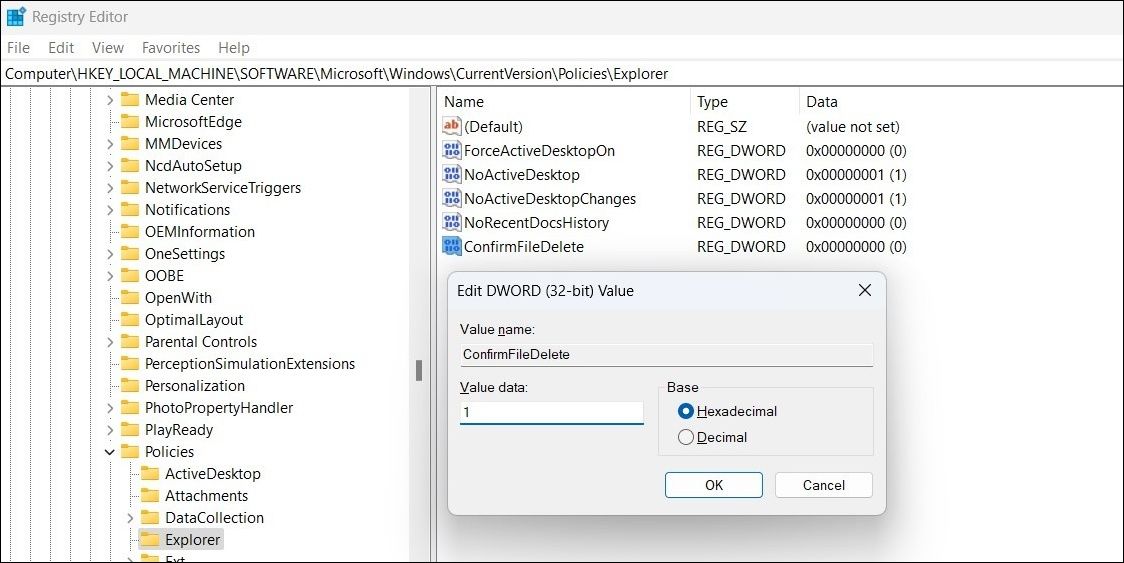
Create a New DWORD Value: Right-click in the right pane of the Registry Editor and select "New" followed by "DWORD (32-bit) Value."
-
Name the Value: Name the newly created DWORD value "ConfirmFileDelete."
-
Set the Value Data: Double-click the "ConfirmFileDelete" value and set the "Value data" to "1." This enables the confirmation dialog for file deletion.
-
Restart the System: Close the Registry Editor and restart your computer for the changes to take effect.
Method 2: Utilizing Third-Party Software
Alternatively, several third-party software applications are available that offer "ask before delete" functionality. These programs typically integrate seamlessly with Windows 10 and provide a user-friendly interface for managing file deletion confirmation settings.
-
Choose a Reputable Software: Research and select a reliable third-party software application that offers "ask before delete" functionality. Consider factors such as user reviews, compatibility with your Windows version, and features.
-
Install and Configure: Download and install the chosen software on your system. Follow the provided instructions to configure the software settings, enabling "ask before delete" prompts for file deletion.
-
Test and Adjust: Once the software is installed and configured, test its functionality by attempting to delete a file. Adjust the software settings as needed to achieve the desired level of confirmation.
Benefits of Enabling Confirmation Dialogs
The benefits of enabling confirmation dialogs before deleting files are substantial, contributing to a more secure and user-friendly computing experience:
- Reduced Accidental Data Loss: Confirmation dialogs serve as a vital safety net, preventing the accidental deletion of important files. This is especially crucial for users who are prone to making mistakes or working in a fast-paced environment.
- Increased Data Security: By requiring confirmation before deleting files, the risk of malicious software or unauthorized users deleting critical data is significantly reduced. This can be essential for protecting sensitive information and maintaining data integrity.
- Enhanced User Control: Confirmation dialogs empower users with greater control over their data, allowing them to make informed decisions about file deletion. This can lead to a more confident and efficient computing experience.
FAQs
Q: What happens if I accidentally delete a file without confirmation?
A: If a file is deleted without confirmation, it is typically moved to the Recycle Bin. However, if the Recycle Bin is full or the file has been permanently deleted, recovery may be difficult or impossible.
Q: Can I enable confirmation dialogs for specific file types?
A: While the registry method does not offer file type-specific confirmation, some third-party software applications provide options to configure confirmation dialogs for specific file types.
Q: Is there any risk associated with modifying the registry?
A: Modifying the registry can be risky if not done correctly. Incorrect changes can lead to system instability or data loss. It is crucial to create a system restore point before making any changes to the registry.
Tips
- Use a Backup Strategy: Regularly back up your important files to an external drive or cloud storage service. This provides a safety net in case of accidental deletion or system failure.
- Consider a Third-Party Software Solution: If you prefer a more user-friendly approach, consider using a reputable third-party software application that offers "ask before delete" functionality.
- Review and Adjust Settings: After enabling confirmation dialogs, review and adjust the settings as needed to ensure they meet your specific needs and preferences.
Conclusion
Enabling confirmation dialogs before deleting files in Windows 10 is a simple yet effective step towards safeguarding your data and preventing accidental data loss. While Windows 10 does not offer a built-in "ask before delete" setting, using the registry method or employing third-party software solutions can provide this crucial functionality. By implementing these methods, users can gain greater control over their data and enjoy a more secure and user-friendly computing experience. Remember to exercise caution when modifying the registry and consider a comprehensive backup strategy to further protect your valuable data.


Closure
Thus, we hope this article has provided valuable insights into Safeguarding Data: A Comprehensive Guide to Enabling Confirmation Dialogs in Windows 10. We appreciate your attention to our article. See you in our next article!