Reclaiming Your Screen: A Comprehensive Guide to Resolving Overscan in Windows 11
Related Articles: Reclaiming Your Screen: A Comprehensive Guide to Resolving Overscan in Windows 11
Introduction
In this auspicious occasion, we are delighted to delve into the intriguing topic related to Reclaiming Your Screen: A Comprehensive Guide to Resolving Overscan in Windows 11. Let’s weave interesting information and offer fresh perspectives to the readers.
Table of Content
Reclaiming Your Screen: A Comprehensive Guide to Resolving Overscan in Windows 11
Overscan, a phenomenon where the displayed image extends beyond the physical boundaries of the screen, can be a frustrating issue for Windows 11 users. This often results in a loss of valuable screen real estate, cutting off parts of the displayed content, particularly noticeable in games, videos, and certain applications. While overscan is a legacy feature designed for older analog televisions, it can persist in modern displays, leading to an incomplete viewing experience.
This article provides a comprehensive guide to resolving overscan in Windows 11, equipping users with the necessary knowledge and tools to reclaim their full screen space.
Understanding Overscan and its Impact
Overscan originates from the limitations of analog television technology. Analog signals were designed to accommodate variations in television screen sizes, and overscan ensured that the entire image was visible on different screens, regardless of their exact dimensions. However, this approach results in a portion of the displayed content being cut off, particularly at the edges of the screen.
Modern digital displays are not subject to these limitations. They are precise in their dimensions, and overscan becomes unnecessary. In fact, it can be detrimental, as it reduces the usable screen area, making the displayed content appear smaller and potentially losing vital information. This can be particularly problematic for users who rely on their screens for productivity, gaming, or creative work.
Identifying Overscan in Windows 11
Recognizing overscan is the first step towards resolving it. Here are some common signs:
- Missing Content: Parts of the displayed content, particularly at the edges, are cut off. This can be noticeable in games, videos, web pages, or even the Windows desktop itself.
- Inaccurate Display Size: The desktop or applications appear smaller than expected, leaving unused space around the edges of the screen.
- Black Bars: Black bars may appear around the edges of the screen, indicating that the displayed content is not utilizing the full screen area.
Resolving Overscan in Windows 11: A Multifaceted Approach
Addressing overscan in Windows 11 requires a multifaceted approach, leveraging both hardware and software solutions. The following methods can be employed to effectively eliminate overscan and reclaim the full screen space:
1. Utilizing Display Settings
Windows 11 provides a dedicated section in the Display Settings to manage screen resolution and scaling. This is a good starting point for addressing overscan:
- Navigate to Display Settings: Open the Start menu and search for "Display settings".
- Adjust Screen Resolution: In the "Scale and layout" section, select the correct screen resolution for your display. Ensure that the selected resolution matches the native resolution of your monitor. This ensures that the displayed content fills the entire screen without any scaling issues.
- Enable "Adjust for best display on this display": This option may be available under "Scale and layout" or "Advanced display settings". Enabling this option can automatically adjust the display settings for optimal viewing on your specific monitor.
2. Leveraging Graphics Driver Settings
Modern graphics cards often offer advanced display settings that can help address overscan issues. These settings are typically accessed through the graphics driver control panel:
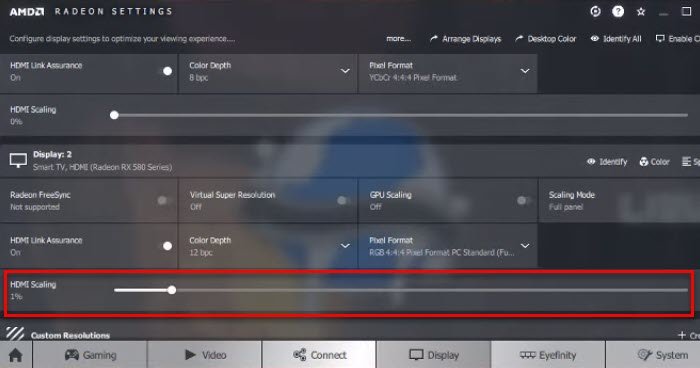
- Access Graphics Driver Settings: Right-click on the desktop and select "NVIDIA Control Panel" (for NVIDIA cards) or "AMD Radeon Software" (for AMD cards).
- Adjust Display Settings: Locate the "Display" or "Video" section within the control panel. Search for options related to "overscan", "underscan", or "scaling".
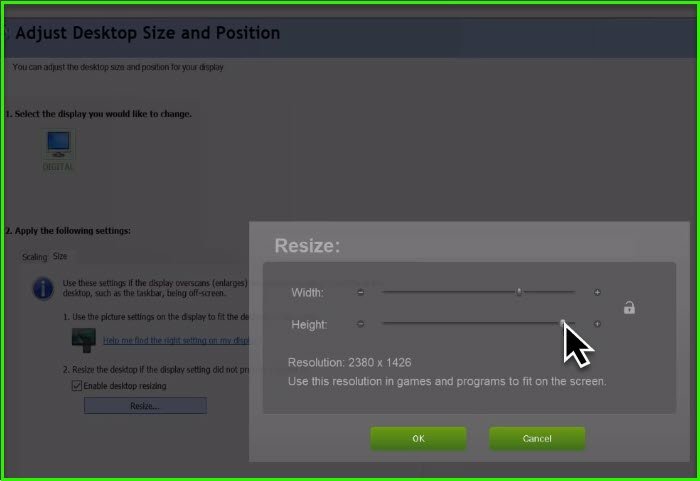
- Enable Underscan or Adjust Scaling: Adjust the overscan or underscan settings to compensate for any discrepancies between the displayed image and the physical screen boundaries. Experiment with different scaling options to find the ideal setting for your display.
3. Exploring Third-Party Utilities
While Windows 11 offers basic tools for managing display settings, specialized third-party utilities can provide more granular control over overscan and scaling:
- Display Tuner: This utility allows users to fine-tune display settings, including overscan adjustments, aspect ratio settings, and scaling options.
- Custom Resolution Utility: This utility provides a more advanced approach to managing screen resolutions, allowing users to create custom resolutions for their displays.
4. Adjusting Application Settings
Some applications provide their own settings to adjust display scaling and overscan. These settings can be accessed within the application’s options or preferences menu:
- Game Settings: Many games offer built-in settings to adjust display scaling and aspect ratio. These settings can be found within the game’s options menu.
- Video Player Settings: Video players like VLC or MPC-HC allow users to adjust video playback settings, including aspect ratio and scaling options.
5. Using the Windows Magnifier
The Windows Magnifier tool can be used to temporarily enlarge the displayed content, effectively reducing the impact of overscan. This is a temporary solution, but it can be helpful for viewing content that is partially obscured by overscan:
- Open Windows Magnifier: Search for "Magnifier" in the Start menu and open the application.
- Adjust Magnification Level: Use the magnification slider or the keyboard shortcuts to increase the magnification level. This will enlarge the displayed content, making it easier to view the entire image.
FAQs: Addressing Common Concerns
Q: Is overscan a hardware or software issue?
A: Overscan can be caused by both hardware and software factors. It can be a result of the display itself, the graphics card, or the operating system settings.
Q: Why is my screen resolution limited in Windows 11?
A: Overscan can limit the available screen resolutions in Windows 11. When overscan is enabled, the display driver may not recognize the full screen area, resulting in a reduced range of available resolutions.
Q: Can I permanently disable overscan in Windows 11?
A: While there is no single setting to permanently disable overscan in Windows 11, the methods discussed in this article can effectively eliminate its impact.
Q: What are the benefits of resolving overscan?
A: Resolving overscan offers several benefits:
- Improved Viewing Experience: Reclaiming the full screen area enhances the viewing experience, ensuring that all content is visible without being cut off.
- Increased Productivity: The extra screen space can be utilized for multitasking, productivity applications, or creative work, enhancing overall efficiency.
- Enhanced Gaming Experience: In games, resolving overscan can improve the field of view, provide a more immersive experience, and potentially enhance performance.
Tips for Resolving Overscan Effectively
- Start with Basic Settings: Begin by adjusting the screen resolution and scaling settings in Windows 11’s Display settings. These simple adjustments can often address overscan issues.
- Consult Your Display’s Manual: Refer to the user manual for your monitor to identify any built-in overscan settings or adjustments.
- Experiment with Graphics Driver Settings: Explore the advanced display settings in your graphics card’s control panel to find options related to overscan, underscan, or scaling.
- Try Third-Party Utilities: If you are unable to resolve overscan through standard settings, consider using specialized third-party utilities like Display Tuner or Custom Resolution Utility.
- Contact Manufacturer Support: If all else fails, contact the manufacturer of your display or graphics card for assistance. They may have specific troubleshooting steps or solutions tailored to your hardware.
Conclusion
Overscan can be a frustrating issue, but it is not insurmountable. By understanding the underlying causes and employing the methods discussed in this guide, Windows 11 users can effectively eliminate overscan and reclaim their full screen space. This will not only enhance the visual experience but also improve productivity, gaming performance, and overall user satisfaction. Remember to experiment with different settings and solutions to find the optimal configuration for your specific display and hardware.
![Overscaling Or Overscan in Windows 10 and Windows 11 [Fixed]](https://www.techcommuters.com/wp-content/uploads/2021/05/1.-Change-Display-Setting-768x539.png)
![Overscaling Or Overscan in Windows 10 and Windows 11 [Fixed]](https://www.techcommuters.com/wp-content/uploads/2021/06/How-to-Fix-Overscan-in-Windows-10-1-1024x576.jpg)
![Overscaling Or Overscan in Windows 10 and Windows 11 [Fixed]](https://www.techcommuters.com/wp-content/uploads/2021/05/2.-Scale-and-Layout-1-768x432.jpg)
![Overscaling Or Overscan in Windows 10 and Windows 11 [Fixed]](https://www.techcommuters.com/wp-content/uploads/2021/05/6.-Windows-update-768x512.png)
![Overscaling Or Overscan in Windows 10 and Windows 11 [Fixed]](https://www.techcommuters.com/wp-content/uploads/2021/05/4.-Display-adapter-properties-1024x576.jpg)

Closure
Thus, we hope this article has provided valuable insights into Reclaiming Your Screen: A Comprehensive Guide to Resolving Overscan in Windows 11. We thank you for taking the time to read this article. See you in our next article!