Navigating Windows 10 Repair Attempts: A Comprehensive Guide
Related Articles: Navigating Windows 10 Repair Attempts: A Comprehensive Guide
Introduction
With great pleasure, we will explore the intriguing topic related to Navigating Windows 10 Repair Attempts: A Comprehensive Guide. Let’s weave interesting information and offer fresh perspectives to the readers.
Table of Content
Navigating Windows 10 Repair Attempts: A Comprehensive Guide

Windows 10, despite its robust design, can occasionally encounter issues that disrupt the user experience. When these issues arise, Windows may initiate a repair process, often displaying the message "Attempting Repairs." This message indicates that the operating system is attempting to diagnose and resolve the underlying problem. While this automatic repair process can be successful in many cases, there are instances where manual intervention is required to restore functionality.
This guide provides a comprehensive overview of troubleshooting and resolving Windows 10 repair attempts, equipping users with the knowledge and tools to address various scenarios effectively.
Understanding "Attempting Repairs"
The "Attempting Repairs" message typically appears when Windows encounters a critical error that prevents it from booting normally. This error could stem from various sources, including:
- Corrupted System Files: Critical system files may become damaged due to hardware failures, malware infections, or improper software installations.
- Boot Sector Issues: The boot sector, responsible for initiating the boot process, can become corrupted, hindering the operating system’s ability to load.
- Driver Conflicts: Incompatible or faulty drivers can cause system instability, leading to repair attempts.
- Hardware Malfunctions: Defective hardware components, such as RAM or hard drives, can trigger system errors and repair attempts.
- Software Conflicts: Conflicting software applications can cause system instability, leading to repair attempts.
Troubleshooting Strategies
1. Basic Troubleshooting Steps:
- Restart the Computer: A simple restart can resolve temporary glitches and allow Windows to recover from minor errors.
- Check for Updates: Ensure that your system is running the latest Windows updates, as they often contain bug fixes and performance enhancements.
- Run System File Checker (SFC): This built-in tool scans and repairs corrupted system files. To run SFC, open Command Prompt as administrator and type "sfc /scannow" and press Enter.
- Run DISM (Deployment Image Servicing and Management): DISM can repair corrupted system images. Open Command Prompt as administrator and type "DISM /Online /Cleanup-Image /RestoreHealth" and press Enter.
- Check for Hardware Issues: Run hardware diagnostics to identify any failing components.
2. Advanced Troubleshooting:
- Safe Mode: Boot into Safe Mode to diagnose and resolve issues caused by conflicting software or drivers.
- System Restore: Roll back your system to a previous restore point, which can potentially resolve issues introduced by recent software installations or updates.
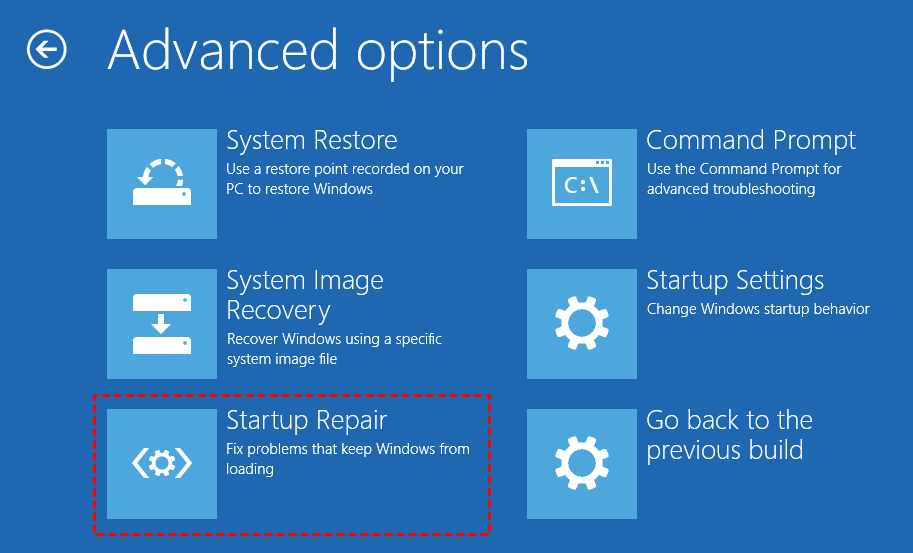
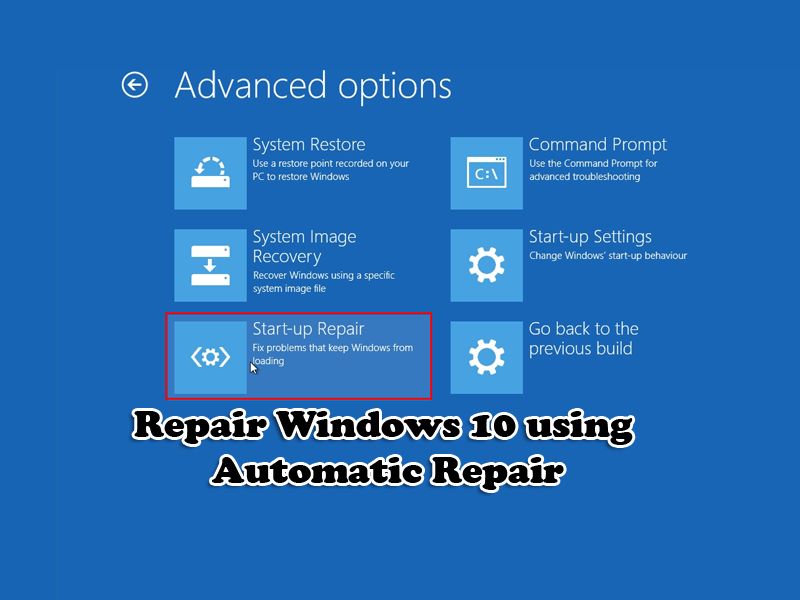
- Boot from Installation Media: Use a bootable USB drive or DVD containing the Windows installation media to access advanced recovery options.
- Reset This PC: This option allows you to reset your computer to its factory settings, removing all data and applications.
- Clean Installation: Perform a clean installation of Windows, which involves formatting the hard drive and installing a fresh copy of the operating system.
3. Addressing Specific Scenarios:
- Blue Screen of Death (BSOD): These errors often indicate critical system failures. Note the error code displayed on the blue screen and use it to search for solutions online.
- Automatic Repair Loop: If Windows continuously attempts repairs without success, try booting into Safe Mode or using the installation media to access advanced recovery options.
- Error Codes: Specific error codes displayed during repair attempts can provide valuable clues about the underlying issue. Search for these codes online to find relevant troubleshooting steps.
Important Considerations:
- Data Backup: Before performing any advanced troubleshooting steps, ensure that your important data is backed up.
- Professional Assistance: If you are unable to resolve the issue through troubleshooting, consider seeking professional assistance from a qualified technician.
Frequently Asked Questions (FAQs):
Q: What should I do if Windows is stuck in a repair loop?
A: If Windows repeatedly attempts repairs without success, try the following:
- Boot into Safe Mode: Accessing Safe Mode can allow you to diagnose and resolve issues caused by conflicting software or drivers.
- Use the Installation Media: Boot from a bootable USB drive or DVD containing the Windows installation media to access advanced recovery options, including System Restore or a clean installation.
Q: What if the "Attempting Repairs" message is accompanied by an error code?
A: Error codes provide specific information about the underlying issue. Search for the error code online to find relevant troubleshooting steps.
Q: Can I lose my data during a repair attempt?
A: In most cases, data loss is not a concern during repair attempts. However, it’s always advisable to have a backup of your important data before performing any advanced troubleshooting steps.
Q: How can I prevent future repair attempts?
A: To minimize the likelihood of future repair attempts:
- Keep Your System Updated: Regularly install Windows updates and software updates to address known vulnerabilities and bugs.
- Scan for Malware: Regularly scan your system for malware to prevent infections that can corrupt system files.
- Monitor Hardware Health: Ensure that your hardware components are functioning correctly and replace any faulty components promptly.
- Maintain a Clean System: Regularly clean up your hard drive, remove unnecessary files, and defragment your hard drive to improve system performance.
Tips for Effective Troubleshooting:
- Be Patient: Troubleshooting can be time-consuming, so be patient and persistent.
- Document Your Steps: Keep track of the steps you take, including any error messages you encounter. This can be helpful for troubleshooting and seeking professional assistance.
- Use Reliable Sources: Consult reputable sources such as Microsoft’s website or trusted technology forums for accurate information and troubleshooting guidance.
Conclusion:
"Attempting Repairs" in Windows 10 is a common occurrence that can be resolved through a systematic approach to troubleshooting. By understanding the underlying causes, implementing basic and advanced troubleshooting steps, and addressing specific scenarios effectively, users can restore functionality and ensure a smooth computing experience. Remember to back up your data before performing any advanced troubleshooting steps and seek professional assistance if necessary. With the right knowledge and tools, you can navigate these repair attempts and maintain a healthy and efficient Windows 10 system.

![Windows 10 Automatic Repair Attempting Repairs Loop FIX [2021 Tutorial]](https://i.ytimg.com/vi/y6y83nusreI/maxresdefault.jpg)
![Repair Windows 10 Using Automatic Repair [Tutorial]](https://benisnous.com/wp-content/uploads/2020/09/1600278903_Repair-Windows-10-Using-Automatic-Repair-Tutorial.jpg)


Closure
Thus, we hope this article has provided valuable insights into Navigating Windows 10 Repair Attempts: A Comprehensive Guide. We hope you find this article informative and beneficial. See you in our next article!