Navigating User Accounts in Windows 11: A Comprehensive Guide to Managing User Switching
Related Articles: Navigating User Accounts in Windows 11: A Comprehensive Guide to Managing User Switching
Introduction
With great pleasure, we will explore the intriguing topic related to Navigating User Accounts in Windows 11: A Comprehensive Guide to Managing User Switching. Let’s weave interesting information and offer fresh perspectives to the readers.
Table of Content
Navigating User Accounts in Windows 11: A Comprehensive Guide to Managing User Switching
Windows 11, like its predecessors, offers robust functionality for managing multiple user accounts. This feature, known as "Fast User Switching," facilitates a seamless transition between different user profiles, allowing for personalized settings and access control. This article delves into the intricacies of managing user accounts in Windows 11, exploring the advantages and techniques for customizing this essential feature.
Understanding User Accounts in Windows 11
At its core, a user account in Windows 11 represents a unique profile for an individual user. Each account possesses its own set of permissions, preferences, and data. This separation ensures that different users can operate the computer independently, maintaining their own settings, files, and applications.
The Benefits of Multiple User Accounts
Multiple user accounts offer numerous advantages, fostering a secure and personalized computing experience:
- Privacy and Security: Each user account operates in isolation, safeguarding personal data and preventing unauthorized access to sensitive information. This is crucial for families or shared computers, ensuring each user’s privacy.
- Customization: Different users can tailor their desktop environment, including background, themes, and installed applications, to suit their individual needs and preferences.
- Account Management: Windows 11 allows for granular control over user permissions, enabling administrators to restrict access to specific files, applications, or system settings. This is particularly beneficial in a business or educational setting where different users require varying levels of access.
- Efficient Resource Allocation: Multiple user accounts enable efficient resource allocation, as each user operates within their own environment, minimizing conflicts and optimizing system performance.
Managing User Accounts in Windows 11
Windows 11 offers a streamlined approach to managing user accounts through the Settings app. Here’s a step-by-step guide to adding, modifying, or deleting user accounts:
- Access the Settings App: Click the Start menu and select "Settings" or press the Windows key + I.
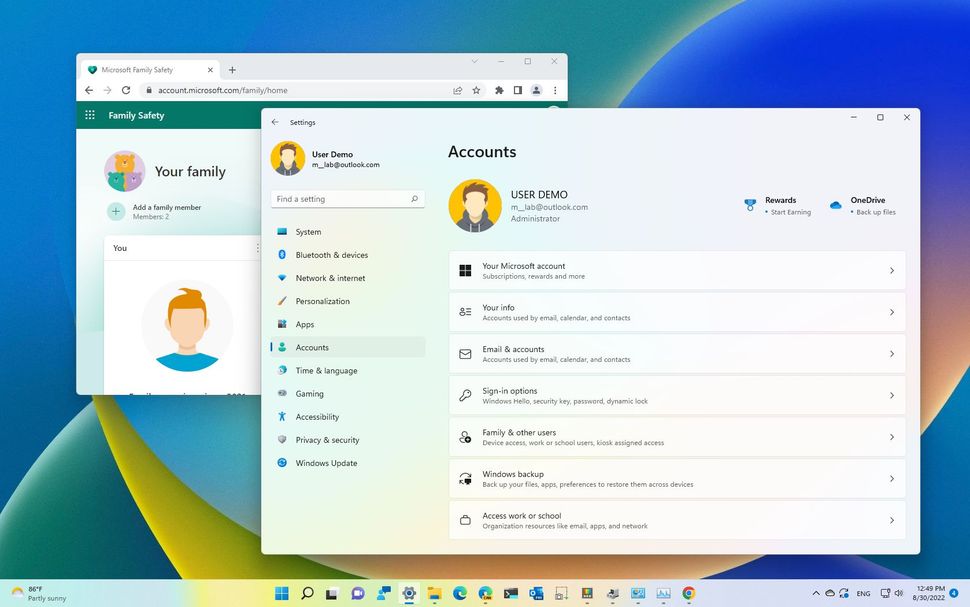
- Navigate to Accounts: In the Settings app, click "Accounts" on the left-hand side panel.
- Manage Users: Choose "Family & other users" to access options for adding new users, managing existing accounts, or changing account types.
Adding a New User Account
To add a new user account, follow these steps:
- Click "Add a user": In the "Family & other users" section, select "Add a user" to initiate the account creation process.
- Choose Account Type: Choose between "For work or school" for a Microsoft account or "For this PC only" for a local account.
- Enter Account Details: Provide the necessary information, including the user’s name, email address, and password (if applicable).
- Confirm and Finish: Review the details and click "Finish" to complete the account creation process.
Modifying Existing User Accounts
To modify an existing user account, follow these steps:
- Select the User Account: In the "Family & other users" section, click on the desired user account to access its settings.
- Edit Account Details: Depending on the account type, you can modify settings such as the user’s name, password, and account type.
- Change Account Type: You can switch an account from local to Microsoft or vice versa.
- Manage Permissions: For local accounts, you can adjust permissions to grant or restrict access to specific files, applications, or system settings.
Deleting User Accounts
To delete a user account, follow these steps:
- Select the User Account: In the "Family & other users" section, click on the desired user account to access its settings.
- Remove User: Click on the "Remove" button to initiate the account deletion process.
- Confirm Deletion: Windows 11 will prompt you to confirm the deletion. Click "Delete account" to proceed.
Customizing User Switching
Windows 11 provides options for customizing the user switching experience, ensuring a smooth transition between different user profiles:
- Enabling Fast User Switching: By default, Fast User Switching is enabled in Windows 11. This feature allows users to switch between accounts without logging out. To enable or disable Fast User Switching, navigate to "Settings > Accounts > Sign-in options" and toggle the "Fast user switching" option.
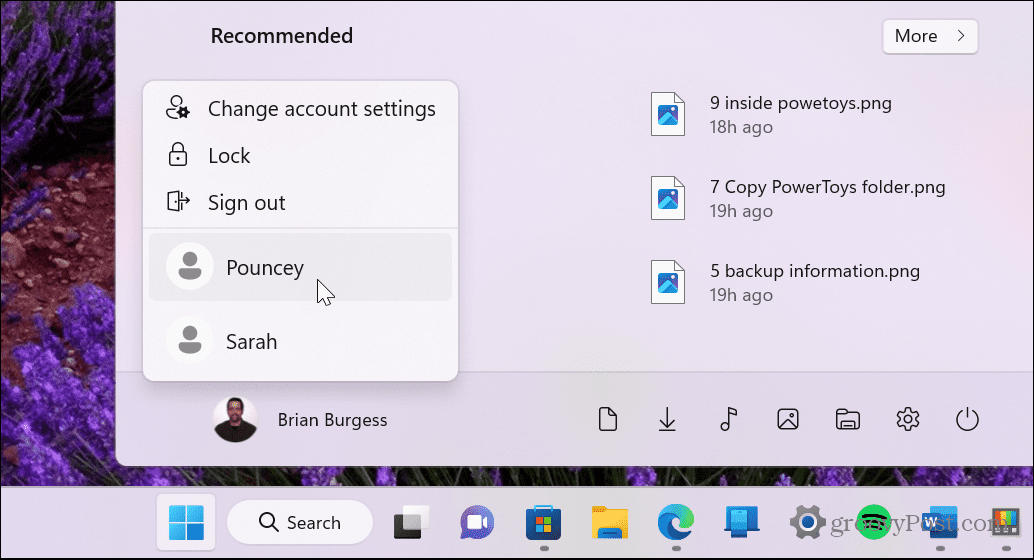
- Using the Switch User Option: To switch between user accounts, click on the user icon in the taskbar and select the desired user account. This will seamlessly transition to the selected user’s environment.
- Setting a Password for Each User: To enhance security, set a password for each user account. This prevents unauthorized access and ensures that only authorized users can access their respective accounts.
Understanding User Account Types
Windows 11 offers two primary user account types:
- Microsoft Account: This account type is linked to a Microsoft email address and offers cloud-based synchronization for settings, files, and applications. It allows access to Microsoft services like OneDrive, Xbox Live, and the Microsoft Store.
- Local Account: This account type is specific to the local computer and does not require a Microsoft email address. It offers a more traditional approach to account management, with settings and data stored locally on the device.
FAQs about User Account Management in Windows 11
Q: Can I have multiple local accounts on my Windows 11 computer?
A: Yes, you can create multiple local accounts on your Windows 11 computer. This allows for separate user profiles and personalized settings for each user.
Q: What are the benefits of using a Microsoft account?
A: Using a Microsoft account offers benefits such as cloud-based synchronization for settings, files, and applications, access to Microsoft services, and a unified experience across multiple devices.
Q: Can I convert a local account to a Microsoft account?
A: Yes, you can convert a local account to a Microsoft account. This process involves linking the local account to an existing Microsoft email address.
Q: How can I restrict access to specific files or applications for a particular user?
A: You can manage user permissions by navigating to "Settings > Accounts > Family & other users" and selecting the desired user account. From there, you can adjust permissions to grant or restrict access to specific files, applications, or system settings.
Q: What happens to my files when I switch user accounts?
A: Each user account has its own dedicated storage space for files and settings. When switching accounts, you will be accessing the files and settings associated with the current user account.
Tips for Effective User Account Management in Windows 11
- Regularly review user account permissions: Ensure that each user account has appropriate access levels to prevent unauthorized modifications or data breaches.
- Use strong passwords for all user accounts: This enhances security and prevents unauthorized access to sensitive information.
- Enable two-factor authentication for Microsoft accounts: This adds an extra layer of security by requiring a secondary verification step during login.
- Create separate user accounts for different purposes: This helps to maintain a clear separation of data and settings, improving organization and security.
- Keep user account information updated: Ensure that contact details and password information are current to prevent access issues.
Conclusion
Managing user accounts in Windows 11 is a crucial aspect of maintaining a secure and personalized computing environment. By understanding the different user account types, customizing user switching options, and managing permissions effectively, users can leverage the full potential of Windows 11’s account management features. This comprehensive guide provides the necessary knowledge and tools for efficiently managing user accounts, ensuring a seamless and secure experience for all users.
![Enable or Disable Fast User Switching in Windows 11 [2024]](https://10pcg.com/wp-content/uploads/enable-or-disable-fast-user-switching-in-windows-11.jpg)


![Enable or Disable Fast User Switching in Windows 11 [2024]](https://10pcg.com/wp-content/uploads/edit-registry-settings-to-enable-or-disable-fast-user-switching.jpg)


Closure
Thus, we hope this article has provided valuable insights into Navigating User Accounts in Windows 11: A Comprehensive Guide to Managing User Switching. We hope you find this article informative and beneficial. See you in our next article!