Navigating Time Zones: Adding Multiple Time Zones in Windows 11
Related Articles: Navigating Time Zones: Adding Multiple Time Zones in Windows 11
Introduction
With enthusiasm, let’s navigate through the intriguing topic related to Navigating Time Zones: Adding Multiple Time Zones in Windows 11. Let’s weave interesting information and offer fresh perspectives to the readers.
Table of Content
Navigating Time Zones: Adding Multiple Time Zones in Windows 11
In a world increasingly interconnected, the need to manage multiple time zones has become commonplace. Whether you’re collaborating with international teams, scheduling meetings across continents, or simply keeping track of loved ones in different parts of the globe, understanding and managing time zones is crucial. Windows 11, with its intuitive design and user-friendly interface, provides a straightforward way to incorporate multiple time zones into your system, simplifying the process of coordinating activities and staying informed about time differences.
Understanding the Importance of Multiple Time Zones
Adding multiple time zones to your Windows 11 system offers a range of benefits, enhancing productivity and streamlining communication:
-
Improved Collaboration: When working with colleagues or clients in different time zones, having their time displayed alongside your own facilitates seamless communication. You can schedule meetings, send emails, and engage in discussions with greater accuracy, ensuring timely responses and effective collaboration.
-
Enhanced Global Awareness: For those involved in international business, travel, or personal connections, keeping track of time zones across the world is essential. Multiple time zones provide a real-time view of different locations, allowing for informed decision-making and efficient planning.
-
Personalized Time Management: Having multiple time zones displayed allows you to personalize your computer experience, aligning it with your specific needs and preferences. You can easily monitor the time in locations relevant to you, regardless of your physical location.
Adding Multiple Time Zones in Windows 11: A Step-by-Step Guide
-
Accessing the Clock and Region Settings: Begin by opening the "Settings" app on your Windows 11 computer. You can do this by searching for "Settings" in the Start menu or by using the keyboard shortcut Windows Key + I.
-
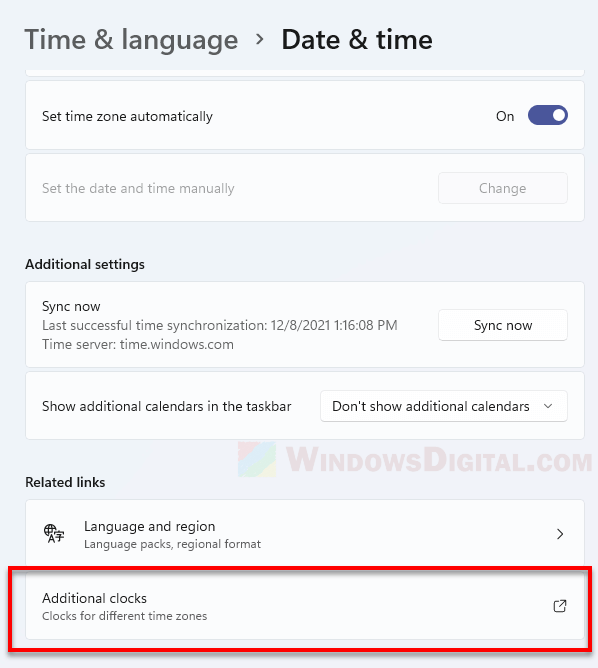
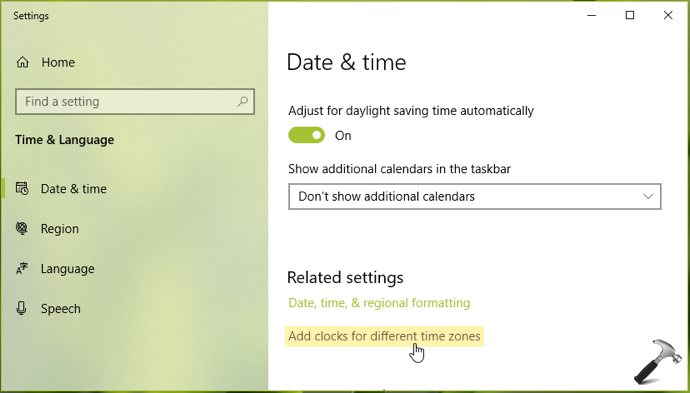
Navigating to Time & Language: Within the Settings app, locate the "Time & Language" section. This section is typically found under the "System" category.
-
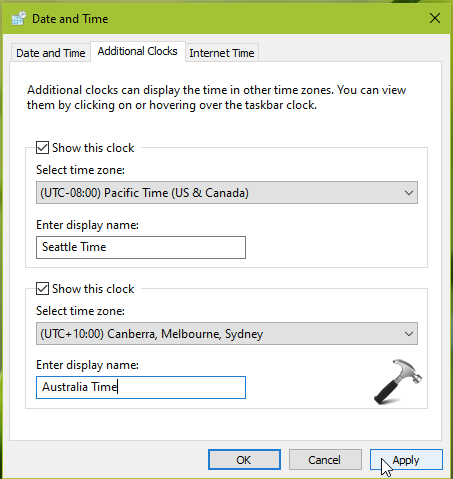
Selecting Additional Clocks: In the "Time & Language" settings, click on the "Additional Clocks" option. This will open a new window where you can manage multiple time zones.
-
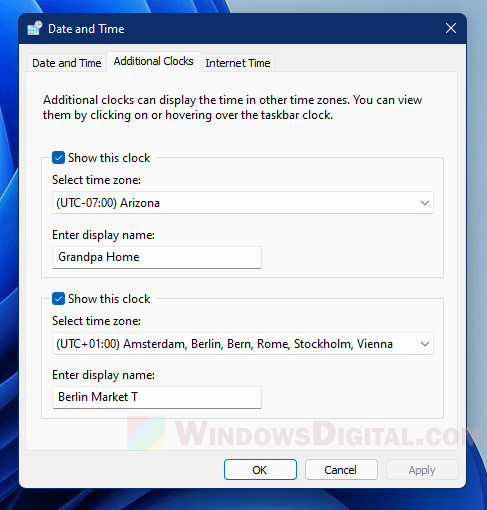
Adding a New Time Zone: Click on the "Add Clocks" button. This action will open a drop-down menu where you can select the time zone you wish to add.
-
Choosing a Time Zone: Browse the list of available time zones and select the one you desire. You can search for specific time zones by typing their names in the search bar at the top of the list.
-
Setting Display Options: After selecting the time zone, you’ll be presented with a few options for displaying the time. You can choose whether to show the time in a 12-hour or 24-hour format, and you can also select whether to display the time zone name alongside the time.
-
Adding Multiple Time Zones: You can repeat steps 4-6 to add as many time zones as you need. Windows 11 allows you to add multiple time zones, making it easy to stay informed about time differences across various locations.
-
Managing Added Time Zones: Once you’ve added multiple time zones, you can manage them through the "Additional Clocks" window. You can change the display options, rearrange the order of time zones, or remove time zones you no longer need.
Customizing Time Zone Display
Windows 11 offers several options for customizing how time zones are displayed on your computer.
-
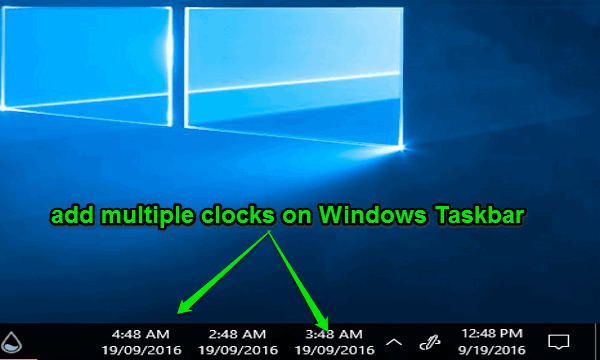
Taskbar Clock: By default, the taskbar clock displays the current time in your primary time zone. However, you can customize it to display the time in a different time zone. Right-click on the taskbar clock, select "Clock settings," and then choose the time zone you want to display.
-
Notification Area: You can also add the time for other time zones to the notification area. Right-click on the taskbar, select "Show more system icons," and then check the box next to the time zone you want to display.
-
Desktop Clock: Windows 11 offers a desktop clock widget that can display the time in multiple time zones. To access this widget, right-click on the desktop, select "Show more options," and then choose "Desktop Clock." You can then add multiple time zones to the desktop clock.
FAQs on Adding Multiple Time Zones in Windows 11
Q: Can I add time zones for locations that do not observe Daylight Saving Time?
A: Yes, Windows 11 allows you to add time zones for locations that do not observe Daylight Saving Time. When selecting a time zone, you will have the option to choose whether to enable Daylight Saving Time.
Q: How do I remove a time zone I no longer need?
A: To remove a time zone, navigate to the "Additional Clocks" settings in the "Time & Language" section. Click on the "Remove" button next to the time zone you want to delete.
Q: Can I set a specific time zone for different applications?
A: While Windows 11 doesn’t allow setting specific time zones for individual applications, you can use third-party applications that offer this functionality. Many productivity and communication tools allow you to customize time zone settings for specific tasks.
Q: How do I ensure the time zones I’ve added are accurate?
A: Windows 11 automatically updates time zone data, ensuring accuracy. However, it’s always a good practice to check the time zone settings periodically and make any necessary adjustments.
Tips for Effective Time Zone Management
-
Utilize Time Zone Converters: Several online and mobile applications offer time zone converters, allowing you to easily compare times across different locations. These tools can be particularly helpful when scheduling meetings or planning international travel.
-
Leverage Time Zone Widgets: Utilize desktop widgets or browser extensions that display multiple time zones simultaneously. This can provide a quick and convenient way to keep track of time differences without switching between settings.
-
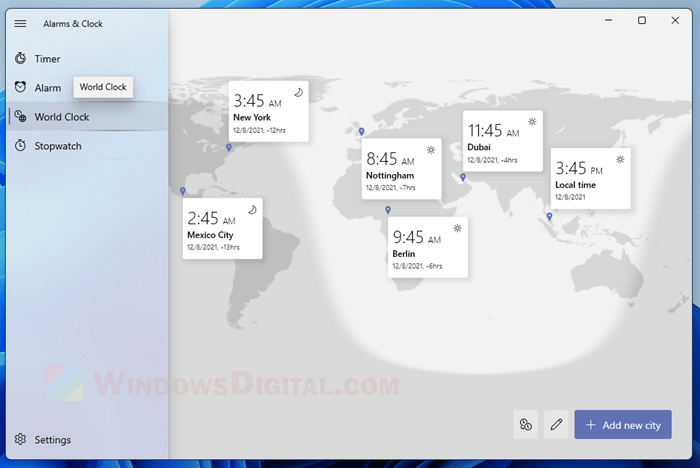
Consider a World Clock App: For those who frequently work with multiple time zones, dedicated world clock applications offer comprehensive features. These apps often provide detailed time zone information, alarms, and customizable displays, making time management more efficient.
Conclusion
Adding multiple time zones in Windows 11 is a simple yet powerful feature that enhances productivity, communication, and global awareness. By incorporating the time zones relevant to your work, personal life, or travel plans, you can streamline your daily tasks, improve communication with international colleagues or loved ones, and gain a clearer understanding of time differences across the world.


Closure
Thus, we hope this article has provided valuable insights into Navigating Time Zones: Adding Multiple Time Zones in Windows 11. We hope you find this article informative and beneficial. See you in our next article!