Navigating Time: How to Add Multiple Time Zones in Windows 11
Related Articles: Navigating Time: How to Add Multiple Time Zones in Windows 11
Introduction
With great pleasure, we will explore the intriguing topic related to Navigating Time: How to Add Multiple Time Zones in Windows 11. Let’s weave interesting information and offer fresh perspectives to the readers.
Table of Content
Navigating Time: How to Add Multiple Time Zones in Windows 11
In a world increasingly interconnected, staying abreast of time across different geographical locations is vital. Whether coordinating with colleagues in remote offices, scheduling calls with international clients, or simply keeping track of loved ones abroad, the ability to manage multiple time zones within your operating system becomes invaluable. Windows 11, with its intuitive interface and robust features, provides users with a simple and efficient way to seamlessly integrate multiple time zones into their daily workflow.
Understanding the Need for Multiple Time Zones
The significance of incorporating multiple time zones into your Windows 11 environment extends beyond mere convenience. It facilitates a more organized and efficient approach to time management, particularly for individuals and organizations operating across diverse geographical regions.
Benefits of Managing Multiple Time Zones:
- Enhanced Time Management: Accurately tracking time in different locations eliminates confusion and fosters efficient scheduling.
- Improved Communication: Facilitating clear communication with individuals or teams in different time zones enhances collaboration and productivity.
- Global Business Operations: Businesses with international operations rely on accurate time zone information to streamline meetings, deadlines, and project management.
- Personal Travel and Communication: Keeping track of time in multiple locations is crucial for travelers and individuals maintaining connections with people in different parts of the world.
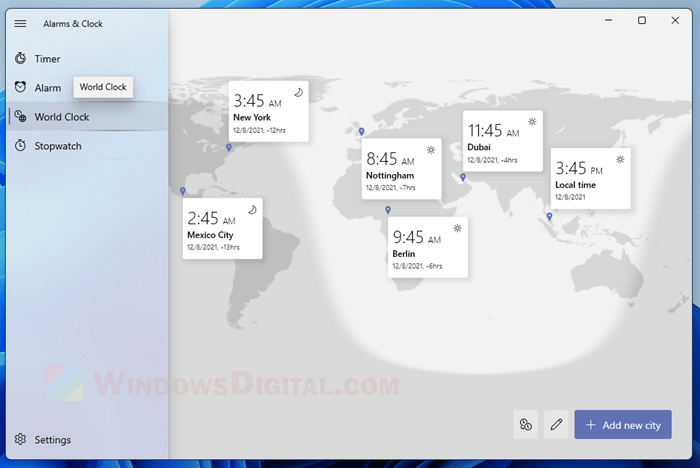
Adding Multiple Time Zones in Windows 11
The process of incorporating multiple time zones in Windows 11 is straightforward and user-friendly. Here’s a step-by-step guide:
-
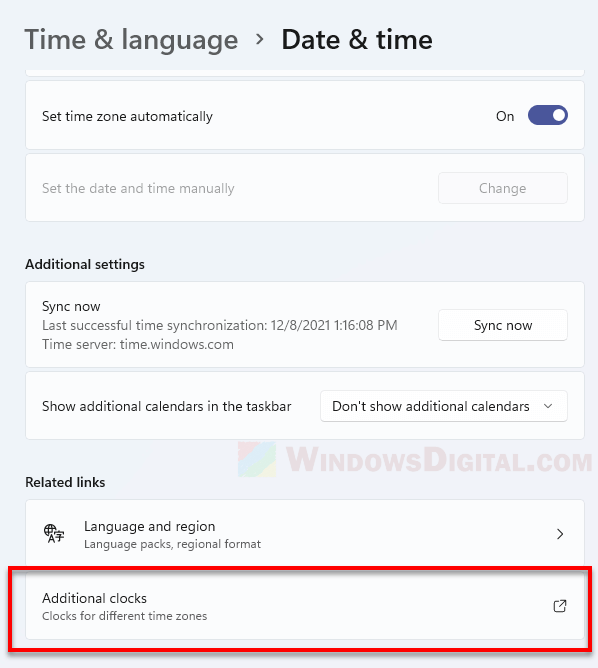
Access the Date and Time Settings:
- Click on the Start Menu and search for "Date & Time."
- Alternatively, navigate to Settings (gear icon) > Time & Language > Date & Time.
-
Add Additional Time Zones:
- Scroll down to the "Add Clocks" section.
- Click on the "Add Clocks for Different Time Zones" option.
- A new window will appear, displaying a list of available time zones.
-
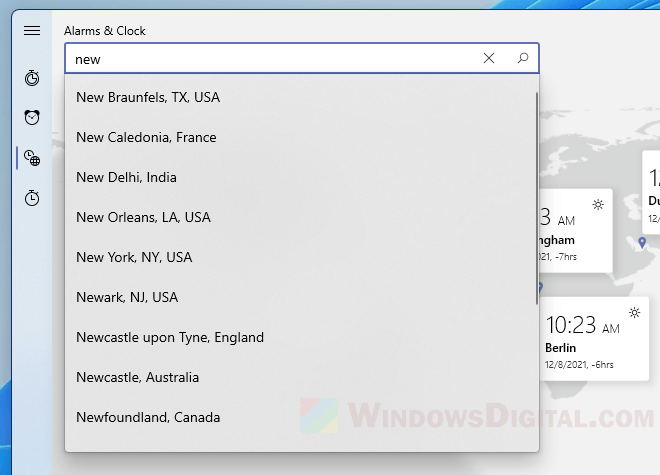
Select the Desired Time Zones:
- Use the search bar or scroll through the list to locate the desired time zones.
- Click on the "Add" button next to each time zone you wish to incorporate.
- You can add as many time zones as required.
-
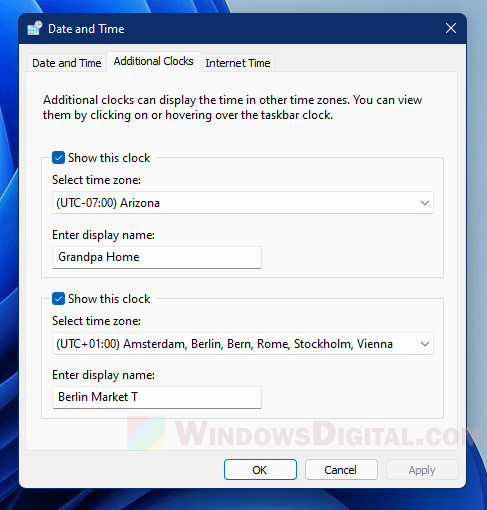
Customize Time Zone Display:
- Once you have added the desired time zones, customize their display by:
- Renaming the time zone to a more recognizable label.
- Choosing a preferred format for displaying the time (e.g., 12-hour or 24-hour).
- Enabling or disabling the display of the time zone’s name in the taskbar.
- Once you have added the desired time zones, customize their display by:
-
Access and Manage Time Zones:
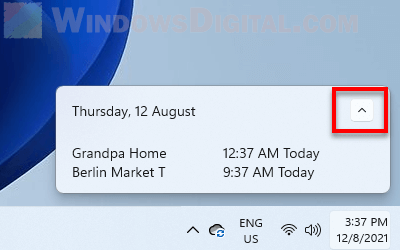
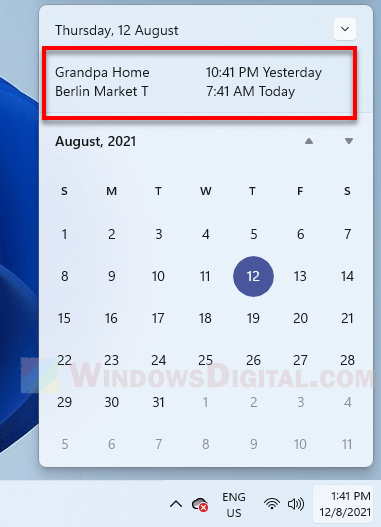
- The added time zones will be visible in the Taskbar and accessible through the Date & Time settings.
- Click on the time in the taskbar to switch between the displayed time zones.
- Use the Date & Time settings to edit or remove added time zones.
Additional Considerations
While adding multiple time zones in Windows 11 is a straightforward process, certain aspects warrant attention:
- Synchronization: Ensure your system’s time is synchronized with an accurate time source to maintain accurate time zone calculations.
- Automatic Updates: Windows 11 automatically updates time zone information, ensuring accuracy and alignment with global time standards.
- Clock and Time Zone Apps: Explore third-party clock and time zone applications for more advanced features and customization options.
FAQs on Adding Multiple Time Zones in Windows 11
Q: Can I add multiple time zones to my Windows 11 system?
A: Yes, Windows 11 allows you to add multiple time zones to your system. This feature is designed to cater to users who need to track time in various locations.
Q: How do I add a specific time zone to my system?
A: To add a time zone, navigate to Settings > Time & Language > Date & Time. Scroll down to the "Add Clocks" section and click on "Add Clocks for Different Time Zones." Select the desired time zone from the list and click "Add."
Q: Can I customize the display of added time zones?
A: Yes, you can customize the display of added time zones by renaming them, choosing a preferred time format, and enabling or disabling the display of the time zone’s name in the taskbar.
Q: How do I access and manage added time zones?
A: Added time zones are accessible through the Taskbar and the Date & Time settings. Click on the time in the taskbar to switch between the displayed time zones. Use the Date & Time settings to edit or remove added time zones.
Q: What happens if I don’t synchronize my system’s time?
A: If your system’s time is not synchronized with an accurate time source, time zone calculations may be inaccurate, leading to discrepancies in time displays.
Q: Does Windows 11 automatically update time zone information?
A: Yes, Windows 11 automatically updates time zone information to ensure accuracy and alignment with global time standards.
Tips for Managing Multiple Time Zones:
- Use a dedicated time zone app: For more advanced features and customization options, consider using a dedicated time zone app.
- Set reminders for important events: Utilize calendar reminders or alarms to stay informed about events happening in different time zones.
- Communicate clearly about time zones: When scheduling meetings or communicating with individuals in different time zones, be explicit about the time zone being used.
- Utilize online time zone converters: Online time zone converters can be helpful for quickly determining the current time in different locations.
Conclusion
Managing multiple time zones in Windows 11 is a simple yet essential feature for individuals and organizations operating across geographical boundaries. By adding and customizing time zones within the operating system, users can seamlessly track time in different locations, enhancing communication, productivity, and overall time management. Whether navigating global business operations, connecting with loved ones abroad, or simply staying informed about events in different parts of the world, the ability to manage multiple time zones in Windows 11 empowers users to navigate the complexities of time with ease and efficiency.


Closure
Thus, we hope this article has provided valuable insights into Navigating Time: How to Add Multiple Time Zones in Windows 11. We appreciate your attention to our article. See you in our next article!