Navigating the Gateway: Accessing the BIOS in Windows 10
Related Articles: Navigating the Gateway: Accessing the BIOS in Windows 10
Introduction
With enthusiasm, let’s navigate through the intriguing topic related to Navigating the Gateway: Accessing the BIOS in Windows 10. Let’s weave interesting information and offer fresh perspectives to the readers.
Table of Content
Navigating the Gateway: Accessing the BIOS in Windows 10
The BIOS, or Basic Input/Output System, is the fundamental software that initializes your computer’s hardware upon startup. It acts as the bridge between your operating system and the physical components of your machine, ensuring a smooth and efficient boot process. While often unseen, the BIOS plays a crucial role in controlling essential functions like boot order, system time, and hardware configuration. Accessing the BIOS, therefore, provides a critical point of control for managing and optimizing your computer’s performance.
Understanding the Importance of BIOS Access
Accessing the BIOS is essential for various tasks, ranging from basic troubleshooting to advanced customization. Here are some key reasons why navigating this critical system is beneficial:
- Boot Order Management: The BIOS determines the order in which your computer attempts to boot from different storage devices like hard drives, SSDs, or USB drives. This functionality is crucial for troubleshooting boot issues, installing operating systems, or setting up dual boot configurations.
- Hardware Configuration: The BIOS allows you to adjust settings related to your computer’s hardware, such as the boot mode (UEFI or Legacy), CPU frequency, memory settings, and even the boot logo. This level of control is invaluable for performance tuning, troubleshooting hardware conflicts, and enabling advanced features.
- Security Settings: The BIOS provides security options like password protection, secure boot, and network boot settings. These features are essential for safeguarding your system from unauthorized access and potential malware.
- Troubleshooting Boot Issues: When your computer encounters boot errors, accessing the BIOS can help you identify the source of the problem. You can check for errors in the boot process, diagnose hardware failures, or even reset the system to its factory defaults.
The Diverse Pathways to BIOS Access
Accessing the BIOS in Windows 10 can be achieved through various methods, each tailored to different hardware and system configurations. Here’s a comprehensive breakdown of the most common approaches:
1. The Ubiquitous "F" Keys:
- F2, F10, F12: These are the most widely used keys for accessing the BIOS. The specific key varies depending on the manufacturer of your motherboard. Consult your motherboard manual or search online for your specific model to determine the correct key.
- Timing is Key: To access the BIOS using these keys, you need to press them repeatedly as your computer starts up, often during the initial splash screen or logo display. The timing is critical; if you press the key too late, you might miss the window to access the BIOS.
2. The "Delete" Key:
- A Classic Alternative: Some older systems or specific motherboard models might use the "Delete" key to access the BIOS. Again, consult your motherboard documentation for confirmation.
3. The "Esc" Key:
- Navigating the Boot Menu: Pressing the "Esc" key during startup might open a boot menu instead of the BIOS directly. This menu allows you to choose a boot device or access the BIOS settings.
4. UEFI Boot Menu:
- The Modern Approach: Windows 10 systems with UEFI boot enabled often have a dedicated boot menu accessed by pressing a specific key during startup, typically "F11" or "F12." This menu allows you to select the boot device or access the BIOS.
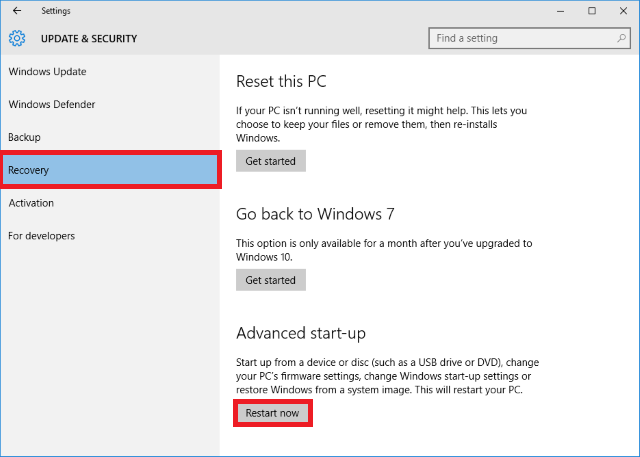
5. The "Shift" Key + Restart:
- Windows 10’s Built-in Option: Within Windows 10 itself, you can access the boot menu by holding down the "Shift" key while clicking the "Restart" option in the Start menu. This will open the "Advanced Startup Options" menu, where you can choose to "Troubleshoot" and then access the UEFI firmware settings (BIOS).
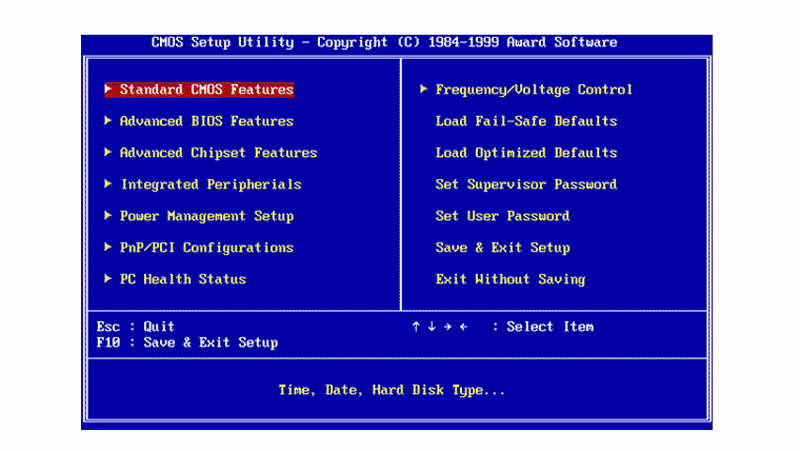
Navigating the BIOS Interface:
Once you’ve successfully accessed the BIOS, you’ll be presented with a text-based interface. This interface varies depending on your motherboard manufacturer. However, the general navigation principles remain consistent:
- Arrow Keys: These keys are used to move between menu options and settings.
- Enter Key: This key selects the current option or enters a submenu.
- Esc Key: This key typically returns to the previous menu or exits the BIOS.
- F Keys: Many BIOS interfaces utilize F keys for specific actions like saving changes (F10), exiting without saving (F1), or accessing advanced options.
The Essential BIOS Settings:
While the specific settings available in the BIOS vary depending on your motherboard, some essential configurations are common across most systems:
- Boot Order: This setting defines the order in which your computer attempts to boot from different storage devices. You can prioritize your hard drive, SSD, or USB drive to ensure smooth booting.
- Boot Mode: This setting determines whether your system boots in UEFI or Legacy mode. UEFI is a newer, more secure boot standard that offers advanced features.
- CPU Settings: The BIOS allows you to adjust the CPU’s frequency, voltage, and other settings for performance tuning or overclocking.
- Memory Settings: You can configure the memory speed, timings, and other settings to optimize your system’s performance.
- Security Settings: The BIOS offers security options like passwords, secure boot, and network boot settings to protect your system from unauthorized access.
- System Time and Date: You can set the system’s time and date using the BIOS.
Important Notes and Tips:
- Consult Your Motherboard Manual: The most reliable source of information about your specific BIOS settings and access methods is your motherboard manual.
- Backup Your BIOS Settings: Before making any changes in the BIOS, it’s essential to back up the current settings. This way, you can easily restore the original configuration if needed.
- Be Cautious with Overclocking: Overclocking can increase performance but can also lead to system instability or hardware damage. Proceed with caution and only if you understand the potential risks.
- Always Save Changes: After making any changes in the BIOS, remember to save them before exiting. Failure to save will result in your changes not being applied.
- Reset to Defaults: If you’re unsure about a specific setting, you can always reset the BIOS to its default configuration.
Conclusion:
Accessing the BIOS in Windows 10 is a powerful tool for managing and optimizing your computer’s performance. It offers a direct line to your system’s hardware and allows you to control essential settings like boot order, hardware configuration, and security. While the specific methods and settings vary depending on your motherboard, the general principles of navigating the BIOS remain consistent. By understanding these principles and utilizing the information provided, you can confidently access and utilize the BIOS to enhance your computing experience.


.png?width=2334u0026name=Screenshot%20(33).png)

Closure
Thus, we hope this article has provided valuable insights into Navigating the Gateway: Accessing the BIOS in Windows 10. We thank you for taking the time to read this article. See you in our next article!