Mastering Network Configuration: A Guide to Modifying IP Settings in Windows 10
Related Articles: Mastering Network Configuration: A Guide to Modifying IP Settings in Windows 10
Introduction
In this auspicious occasion, we are delighted to delve into the intriguing topic related to Mastering Network Configuration: A Guide to Modifying IP Settings in Windows 10. Let’s weave interesting information and offer fresh perspectives to the readers.
Table of Content
Mastering Network Configuration: A Guide to Modifying IP Settings in Windows 10
The ability to manipulate network settings is a fundamental skill for any computer user, enabling customized network behavior and troubleshooting connectivity issues. In Windows 10, modifying IP settings offers a powerful means to tailor network behavior, overcome connectivity challenges, and enhance security. This guide provides a comprehensive exploration of how to change IP settings in Windows 10, outlining the importance of this process, the different methods available, and the potential benefits of customization.
Understanding IP Addresses and Network Configuration
Before delving into the intricacies of modifying IP settings, it is essential to grasp the fundamental concepts of IP addresses and network configuration. An IP address serves as a unique identifier for a device on a network, allowing communication between devices. In essence, it acts as the digital street address for your computer.
There are two main types of IP addresses:
- Static IP Address: A fixed, unchanging IP address assigned manually to a device. This provides consistent and predictable network behavior, often used for servers and other critical devices.
- Dynamic IP Address: An IP address assigned automatically by a DHCP (Dynamic Host Configuration Protocol) server. This approach offers flexibility, allowing devices to connect to the network without requiring manual configuration.
Why Modify IP Settings?
The need to modify IP settings arises in various scenarios, each with its unique purpose:
- Troubleshooting Connectivity Issues: When a device cannot connect to the internet or specific networks, altering IP settings can help diagnose and resolve the problem. This may involve manually assigning a static IP address or verifying the current IP address configuration.
- Network Security Enhancements: By configuring specific IP addresses and firewall rules, users can restrict network access and enhance security. This is particularly useful for sensitive networks or devices that require heightened protection.
- Dedicated Network Configurations: Specific applications or services may require dedicated IP addresses for optimal performance. This ensures consistent connectivity and avoids potential conflicts with other applications.
- Network Segmentation: Dividing a network into smaller, isolated segments can improve security and performance. This often involves assigning specific IP address ranges to different network segments.
Methods for Modifying IP Settings
Windows 10 provides several methods for modifying IP settings, each with its own advantages and suitability depending on the user’s needs and experience level:
1. The Network and Sharing Center:
The Network and Sharing Center provides a user-friendly interface for managing network connections and settings. To access it, follow these steps:
- Open the Control Panel: Click the Windows Start button and search for "Control Panel."
- Navigate to Network and Sharing Center: Select "Network and Sharing Center" from the Control Panel.
- Choose the Network Connection: Select the network connection you wish to modify (e.g., Ethernet or Wi-Fi).
- Modify Network Properties: Click "Properties" to access the connection’s settings.
2. Command Prompt:
For advanced users, the Command Prompt offers a more powerful and versatile method for manipulating network settings. This method requires familiarity with network commands and syntax. To access the Command Prompt, follow these steps:
- Open the Start Menu: Click the Windows Start button.
- Search for Command Prompt: Type "cmd" in the search bar.
- Run as Administrator: Right-click on "Command Prompt" and select "Run as administrator."
3. Network Adapter Properties:
The Network Adapter Properties provide a detailed view of the network adapter’s settings, including IP address, subnet mask, gateway, and DNS server information. To access Network Adapter Properties:
- Open the Control Panel: Click the Windows Start button and search for "Control Panel."
- Navigate to Network and Sharing Center: Select "Network and Sharing Center" from the Control Panel.
- Choose the Network Connection: Select the network connection you wish to modify (e.g., Ethernet or Wi-Fi).
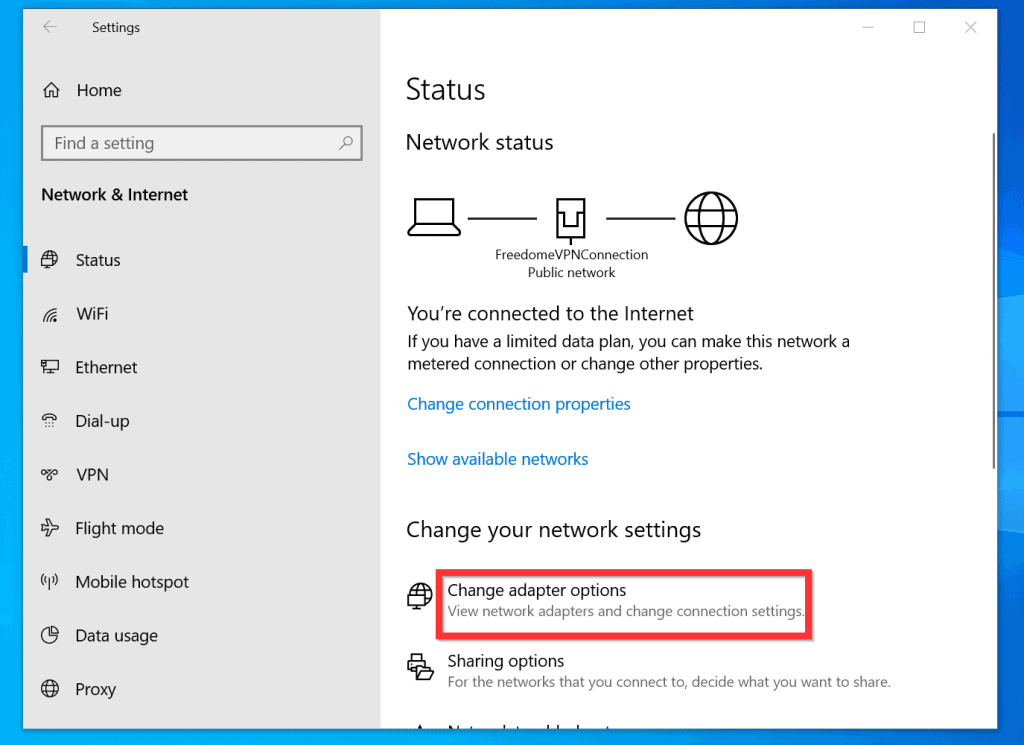
- Change Adapter Settings: Click "Change adapter settings" in the left-hand menu.
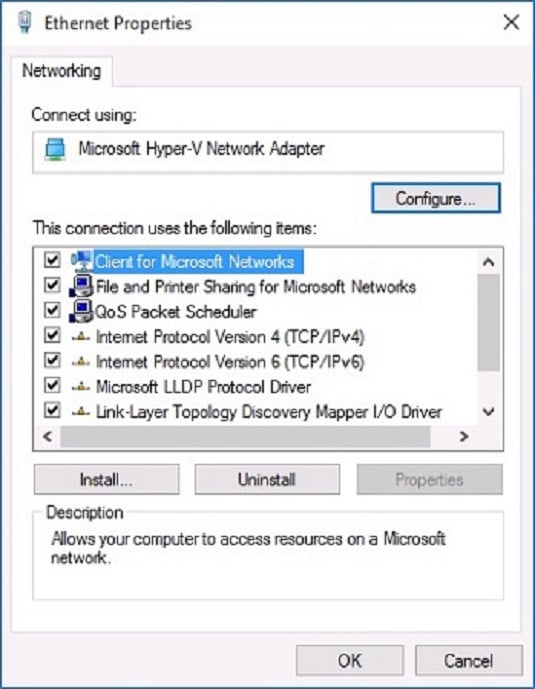
- Access Network Adapter Properties: Right-click on the desired network adapter and select "Properties."
Detailed Explanation of IP Settings
When modifying IP settings, several key parameters require careful consideration:
- IP Address: As discussed earlier, this unique identifier distinguishes your device on the network.
- Subnet Mask: The subnet mask defines the network segment to which your device belongs. It essentially divides the IP address into two parts: the network portion and the host portion.
- Default Gateway: This acts as a bridge between your local network and the internet. It directs traffic to the internet and receives information from the internet.
- DNS Servers: Domain Name System (DNS) servers translate human-readable domain names (e.g., google.com) into numerical IP addresses that computers can understand.
Step-by-Step Guide to Modifying IP Settings
This guide will use the Network and Sharing Center method for modifying IP settings, providing a clear and straightforward approach:
-
Open the Network and Sharing Center: Access the Network and Sharing Center as described earlier.
-
Choose the Network Connection: Select the network connection you wish to modify.
-
Modify Network Properties: Click "Properties" to access the connection’s settings.
-
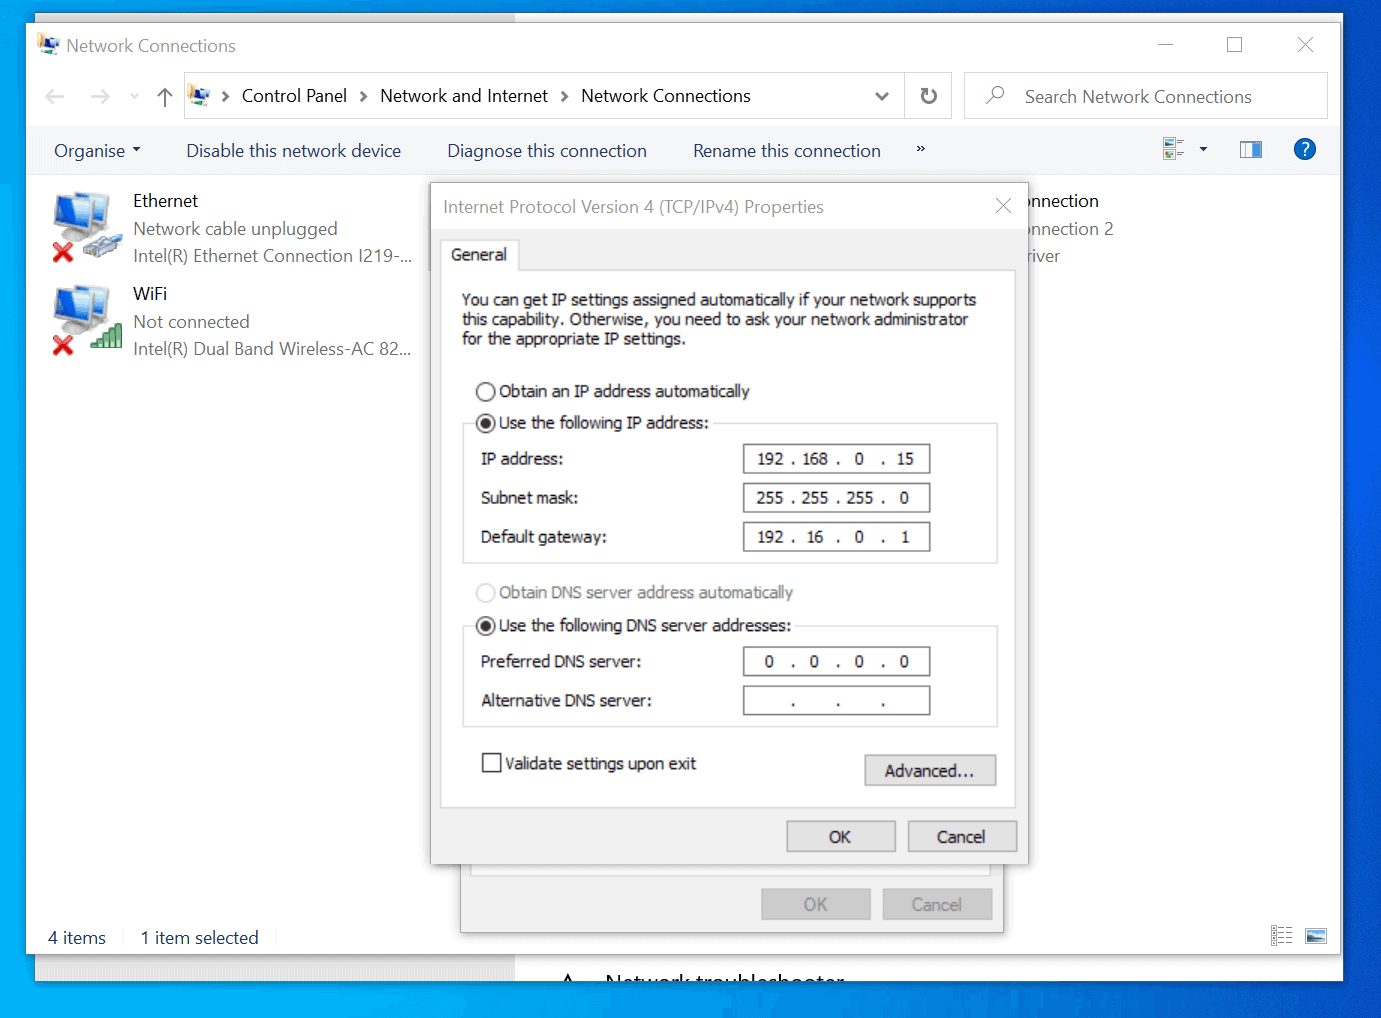
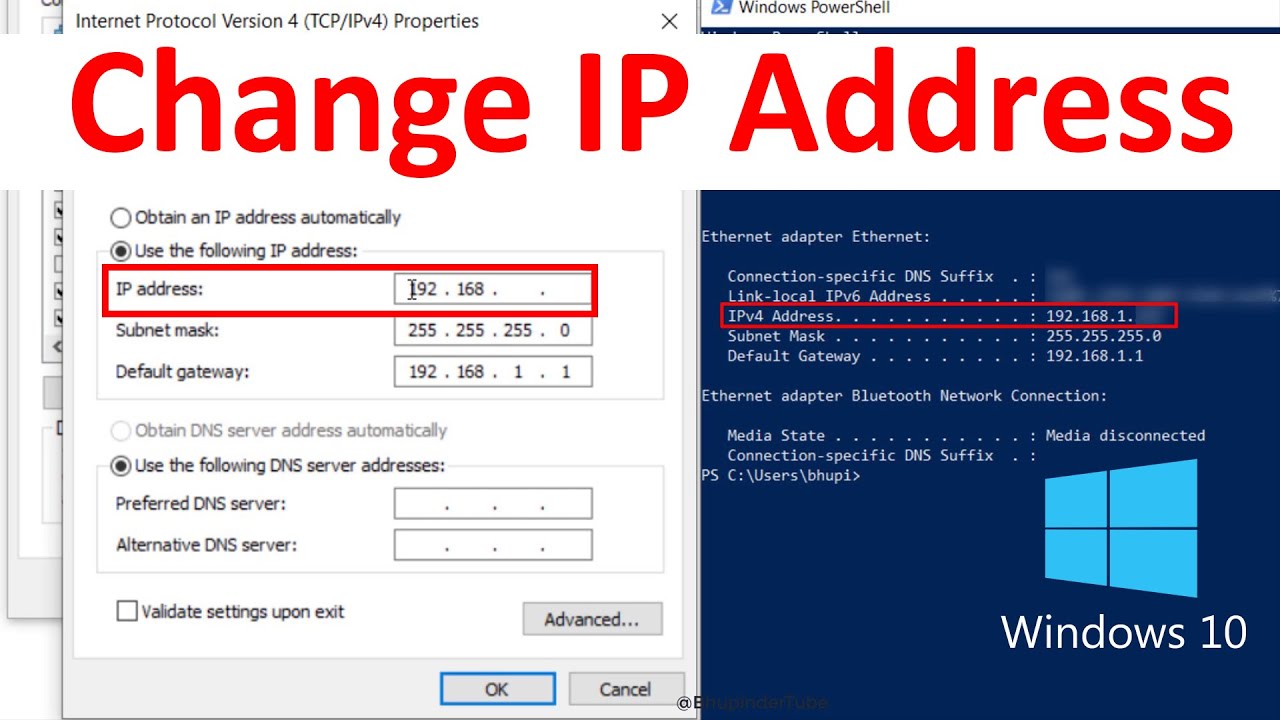
Select Internet Protocol Version 4 (TCP/IPv4): Locate "Internet Protocol Version 4 (TCP/IPv4)" in the list of network components. Select it and click "Properties."
-
Choose IP Address Configuration: You have two options:
-
Obtain an IP Address Automatically: If you prefer a dynamic IP address, leave this option selected. The DHCP server will automatically assign an IP address.
-
Use the Following IP Address: Select this option to manually configure a static IP address.
-
-
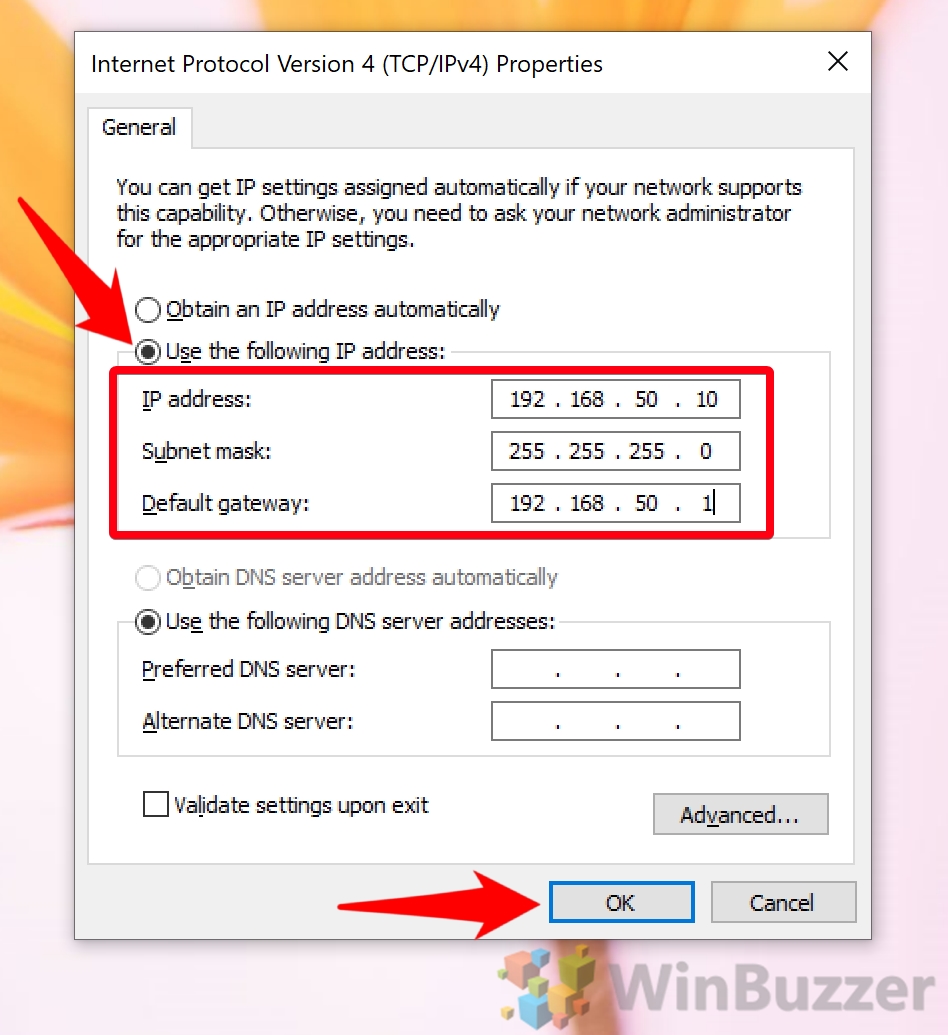
Enter IP Address Information: If you choose to manually configure a static IP address, you will need to enter the following information:
-
IP Address: Enter the desired IP address. Ensure this address is not already in use on the network.
-
Subnet Mask: Enter the appropriate subnet mask for your network. This information is typically provided by your internet service provider (ISP) or network administrator.
-
Default Gateway: Enter the IP address of your router or gateway device. This information is usually provided by your ISP or network administrator.
-
Preferred DNS Server: Enter the IP address of your preferred DNS server. If you are unsure, you can use public DNS servers such as Google Public DNS (8.8.8.8 and 8.8.4.4) or OpenDNS (208.67.222.222 and 208.67.220.220).
-
Alternate DNS Server: You can optionally enter the IP address of an alternate DNS server. This provides redundancy in case your preferred DNS server is unavailable.
-
-
Apply Changes: Click "OK" to apply the changes.
Tips for Modifying IP Settings
- Record Existing Settings: Before making any changes, it is highly recommended to note down the current IP address, subnet mask, default gateway, and DNS server information. This allows for easy reversion to the original settings if needed.
- Consult with Network Administrator: If you are unsure about any of the IP settings or are working on a corporate network, consult with your network administrator before making changes.
- Restart Your Computer: After modifying IP settings, it is essential to restart your computer to ensure the changes take effect.
FAQs About Modifying IP Settings
Q: What happens if I enter incorrect IP settings?
A: Entering incorrect IP settings can prevent your device from connecting to the network or the internet. You may encounter connectivity issues, such as inability to access websites or network resources.
Q: How do I revert to the previous IP settings?
A: To revert to the previous IP settings, follow the same steps outlined above, but select "Obtain an IP address automatically" in the TCP/IPv4 properties. Alternatively, you can use the "Network Reset" feature in Windows 10 to restore network settings to their default values.
Q: Can I use a static IP address on a wireless network?
A: Yes, you can use a static IP address on a wireless network. However, it is important to note that some routers may not support static IP addresses on Wi-Fi connections.
Q: How do I know what IP address is assigned to my device?
A: You can find the IP address assigned to your device by opening the Command Prompt and typing "ipconfig" and pressing Enter. The output will display the current IP address and other network settings.
Conclusion
Modifying IP settings in Windows 10 offers a powerful way to customize network behavior, troubleshoot connectivity problems, and enhance security. By understanding the different methods and key parameters involved, users can confidently manipulate network configurations to meet their specific needs. Remember to consult with network administrators when working on corporate networks and always record existing settings before making any changes. With careful consideration and a solid understanding of the process, users can master the art of network configuration and unlock the full potential of their Windows 10 devices.


Closure
Thus, we hope this article has provided valuable insights into Mastering Network Configuration: A Guide to Modifying IP Settings in Windows 10. We hope you find this article informative and beneficial. See you in our next article!