Mastering File Compression with 7-Zip: A Comprehensive Guide
Related Articles: Mastering File Compression with 7-Zip: A Comprehensive Guide
Introduction
In this auspicious occasion, we are delighted to delve into the intriguing topic related to Mastering File Compression with 7-Zip: A Comprehensive Guide. Let’s weave interesting information and offer fresh perspectives to the readers.
Table of Content
- 1 Related Articles: Mastering File Compression with 7-Zip: A Comprehensive Guide
- 2 Introduction
- 3 Mastering File Compression with 7-Zip: A Comprehensive Guide
- 3.1 Understanding File Compression: The Essence of Efficiency
- 3.2 7-Zip: A Powerful Tool for Efficient Compression
- 3.3 Navigating the 7-Zip Interface: A User-Friendly Approach
- 3.4 Understanding the Benefits of File Compression with 7-Zip
- 3.5 FAQs: Addressing Common Queries About File Compression with 7-Zip
- 3.6 Tips for Effective File Compression with 7-Zip
- 3.7 Conclusion: Embracing Efficiency with 7-Zip
- 4 Closure
Mastering File Compression with 7-Zip: A Comprehensive Guide

File compression is a ubiquitous practice in the digital realm, enabling efficient storage, transmission, and management of data. 7-Zip, a renowned free and open-source archiving utility, stands out for its exceptional compression ratios and versatility. This comprehensive guide delves into the intricacies of file compression using 7-Zip, providing a step-by-step walkthrough and highlighting its advantages.
Understanding File Compression: The Essence of Efficiency
File compression, fundamentally, involves reducing the size of a file without sacrificing its integrity. This reduction is achieved by employing algorithms that identify and eliminate redundancies within the data. These algorithms analyze patterns and repetitions, replacing them with more compact representations. The result is a smaller file that retains the original information.
7-Zip: A Powerful Tool for Efficient Compression
7-Zip distinguishes itself from other archiving utilities through its superior compression ratios, extensive support for various archive formats, and robust security features. It utilizes a unique compression algorithm, LZMA2, known for its exceptional performance, particularly in compressing text and source code files.
Navigating the 7-Zip Interface: A User-Friendly Approach
7-Zip’s user interface is intuitive and readily accessible, even for novice users. The application can be accessed through a graphical user interface (GUI) or a command-line interface (CLI).
Using the 7-Zip GUI:
- Locate the File: Identify the file or folder you wish to compress.
- Right-Click and Select "7-Zip": Right-click on the file or folder and navigate to "7-Zip" in the context menu.
- Choose Compression Options: Select "Add to archive" to compress the file or folder.
-
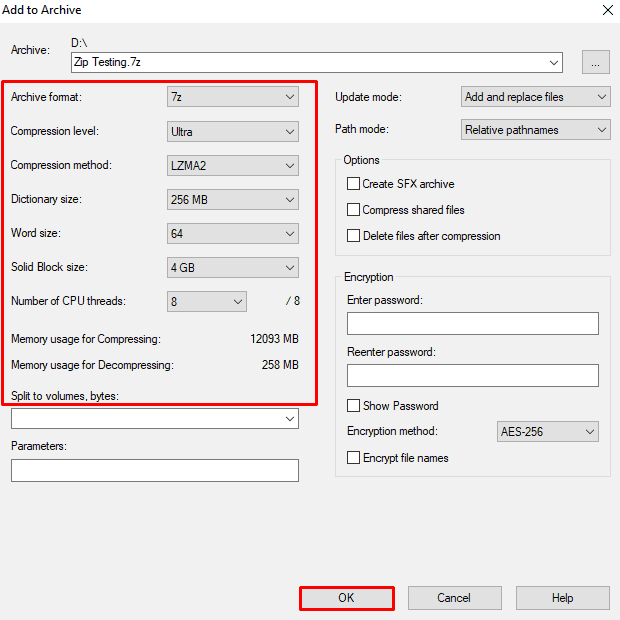
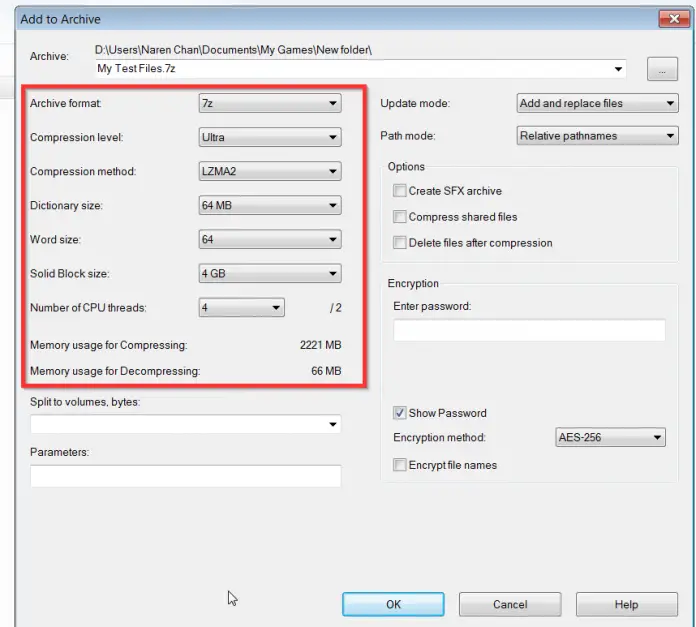
Configure Settings: The "Add to Archive" window offers various settings for customizing the compression process:
- Archive format: Choose from a range of supported formats, including 7z, ZIP, GZIP, and TAR.
- Compression level: Select a compression level based on your needs, ranging from "Store" (no compression) to "Ultra" (highest compression).
- Encryption: If desired, set a password to protect the archive.
- Dictionary size: Adjust the dictionary size to optimize compression based on the file type.
- Select Destination: Specify the location where you want to save the compressed archive.
- Click "OK": Initiate the compression process.
Using the 7-Zip CLI:
- Open the Command Prompt: Access the command prompt by searching for "cmd" in the Windows search bar.
-
Navigate to the File Location: Use the
cdcommand to navigate to the directory containing the file or folder you wish to compress. For example,cd C:UsersusernameDocumentswill navigate to the Documents folder. -
Execute the Compression Command: Use the following command syntax to compress the file:
7z a archive_name.7z file_name.extensionReplace
archive_name.7zwith the desired name for the compressed archive andfile_name.extensionwith the actual file name and extension. -
Customize Compression Options: Add additional parameters to the command to customize the compression process:
-
-t: Specify the archive format, for example,
-tzipfor a ZIP archive. -
-mx: Set the compression level, for example,
-mx9for the highest compression level. -
-p: Set a password for the archive, for example,
-pmypassword. -
-m: Adjust the dictionary size, for example,
-m=256Mfor a 256MB dictionary.
-
-t: Specify the archive format, for example,
Understanding the Benefits of File Compression with 7-Zip
File compression with 7-Zip offers a multitude of advantages:
- Reduced Storage Space: Compressing files significantly reduces their size, freeing up valuable storage space on your hard drive or cloud storage services.
- Faster File Transfers: Smaller files transfer more quickly over networks, reducing waiting times and improving efficiency.
- Enhanced Data Security: 7-Zip allows you to encrypt your archives, safeguarding sensitive data from unauthorized access.
- Improved Data Backup and Recovery: Compressing files facilitates efficient backups and simplifies the process of restoring data in case of loss or corruption.
- Versatile File Management: 7-Zip’s support for numerous archive formats enables seamless integration with various operating systems and applications.
FAQs: Addressing Common Queries About File Compression with 7-Zip
Q: What are the best compression settings for different file types?
A: The optimal compression settings vary depending on the file type. For text files, high compression levels like "Ultra" are generally effective. For images and videos, lower compression levels might be preferable to maintain quality. Experimentation is key to finding the ideal balance between compression ratio and file quality.
Q: Can 7-Zip compress multiple files at once?
A: Yes, 7-Zip can compress multiple files or folders simultaneously. Simply select all the desired files or folders before initiating the compression process.
Q: How can I extract files from a 7-Zip archive?
A: To extract files from a 7-Zip archive, right-click on the archive file, navigate to "7-Zip," and select "Extract to…" or "Extract here." Alternatively, you can use the command-line command 7z e archive_name.7z.
Q: Is it possible to password-protect my archives?
A: Yes, 7-Zip allows you to set a password to protect your archives. When creating a new archive, simply enter the desired password in the "Add to Archive" window.
Q: Can I use 7-Zip on different operating systems?
A: 7-Zip is available for Windows, macOS, and Linux operating systems.
Tips for Effective File Compression with 7-Zip
- Choose the Right Archive Format: Select the most suitable archive format based on your needs and the file type. For instance, 7z offers the highest compression ratio, while ZIP is widely compatible.
- Optimize Compression Levels: Experiment with different compression levels to find the sweet spot between file size reduction and quality preservation.
- Consider Dictionary Size: Increase the dictionary size for larger files to improve compression efficiency.
- Use Encryption for Sensitive Data: Protect confidential files by encrypting your archives with a strong password.
- Regularly Back Up Compressed Archives: Ensure data integrity by creating backups of your compressed archives to prevent data loss.
Conclusion: Embracing Efficiency with 7-Zip
File compression, a fundamental aspect of digital data management, empowers us to store, transmit, and manage data more efficiently. 7-Zip, with its exceptional compression capabilities, versatile format support, and user-friendly interface, stands as a powerful tool for achieving these goals. By understanding the intricacies of file compression and mastering the art of using 7-Zip, individuals can streamline their digital workflow, optimize storage space, and enhance data security.
![How to Highly Compress a file using 7-Zip? [STEP BY STEP]☑️ Red Server Host](https://blog.redserverhost.com/wp-content/uploads/2020/04/HOW-TO-COMPRESS-HIGH-SIZE-FILE-USING-7-ZIP-copy.jpg)


Closure
Thus, we hope this article has provided valuable insights into Mastering File Compression with 7-Zip: A Comprehensive Guide. We appreciate your attention to our article. See you in our next article!