Capturing Your Digital World: A Comprehensive Guide to Taking Screenshots on Windows 11
Related Articles: Capturing Your Digital World: A Comprehensive Guide to Taking Screenshots on Windows 11
Introduction
With great pleasure, we will explore the intriguing topic related to Capturing Your Digital World: A Comprehensive Guide to Taking Screenshots on Windows 11. Let’s weave interesting information and offer fresh perspectives to the readers.
Table of Content
- 1 Related Articles: Capturing Your Digital World: A Comprehensive Guide to Taking Screenshots on Windows 11
- 2 Introduction
- 3 Capturing Your Digital World: A Comprehensive Guide to Taking Screenshots on Windows 11
- 3.1 The Power of Screenshots: Beyond a Simple Snapshot
- 3.2 Navigating the Options: A Comprehensive Guide to Screenshot Methods
- 3.3 Understanding the Differences: Choosing the Right Method
- 3.4 Mastering the Basics: Step-by-Step Instructions
- 3.5 Frequently Asked Questions: Addressing Common Queries
- 3.6 Tips for Taking Effective Screenshots: Enhancing Your Capture
- 3.7 Conclusion: Empowering Yourself with Screenshot Expertise
- 4 Closure
Capturing Your Digital World: A Comprehensive Guide to Taking Screenshots on Windows 11
![How to Take Screenshots on Windows 11 [8 Methods Explained] Beebom](https://beebom.com/wp-content/uploads/2021/07/How-to-Take-Screenshots-on-Windows-11.jpg?w=750u0026quality=75)
In the digital age, where information is readily available and shared at lightning speed, the ability to capture a snapshot of what is displayed on your screen has become an invaluable tool. Whether you need to document a bug, share a specific message, or simply preserve a cherished memory, screenshots provide a simple and effective means of capturing and sharing digital content. This guide will explore the various methods available for taking screenshots on Windows 11, offering a comprehensive understanding of this essential function.
The Power of Screenshots: Beyond a Simple Snapshot
The act of taking a screenshot may seem straightforward, but its applications extend far beyond simply capturing a moment on your screen. Screenshots play a crucial role in:
- Troubleshooting and Reporting Issues: When encountering a technical problem, a screenshot can provide valuable context for reporting the issue to developers or support teams. By capturing the exact error message or the state of a program, users can efficiently communicate the nature of the problem.
- Sharing Information and Ideas: Screenshots are an effective way to share information, instructions, or visual examples with colleagues, friends, or family. They can be used to illustrate a point, highlight specific details, or simply convey information in a visually engaging manner.
- Documenting Processes and Tutorials: Screenshots can be integrated into documentation, tutorials, or guides to provide step-by-step instructions or visual representations of specific processes. This is particularly helpful in technical or educational contexts.
- Preserving Memories and Experiences: Screenshots offer a means of preserving digital memories, such as capturing a moment of success in a game, a funny meme, or a beautiful image displayed on a website. These digital souvenirs can be revisited and shared with others.
- Creating Content and Presentations: Screenshots can be incorporated into presentations, articles, social media posts, or other forms of digital content to enhance visual appeal and provide context.
Navigating the Options: A Comprehensive Guide to Screenshot Methods
Windows 11 provides a variety of methods for taking screenshots, each with its own strengths and specific use cases. Understanding these options empowers users to choose the most appropriate method for their needs.
1. The Classic Print Screen Key:
The Print Screen (PrtScn) key, a staple of keyboard design, remains a simple and effective way to capture a screenshot of the entire screen. Pressing this key copies the current screen content to the clipboard, from which it can be pasted into an image editing program or a document.
2. The Alt+Print Screen Key Combination:
For capturing a specific window or application, the Alt+Print Screen key combination proves invaluable. This shortcut captures only the active window, excluding other elements on the screen, making it ideal for isolating specific content.
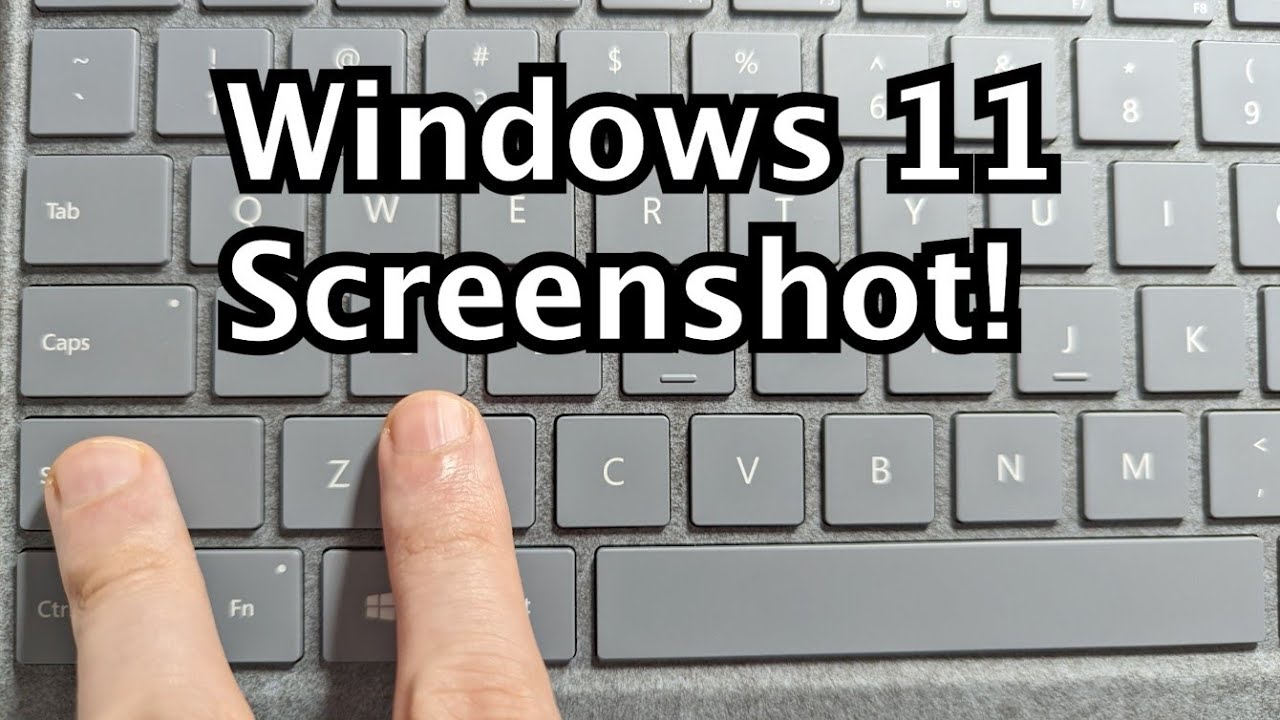
3. The Windows Key + Print Screen Shortcut:
Windows 11 introduces a streamlined method for capturing screenshots using the Windows key and the Print Screen key. This combination automatically saves a screenshot of the entire screen as a PNG file in the Pictures folder, conveniently named "Screenshot (date and time)."
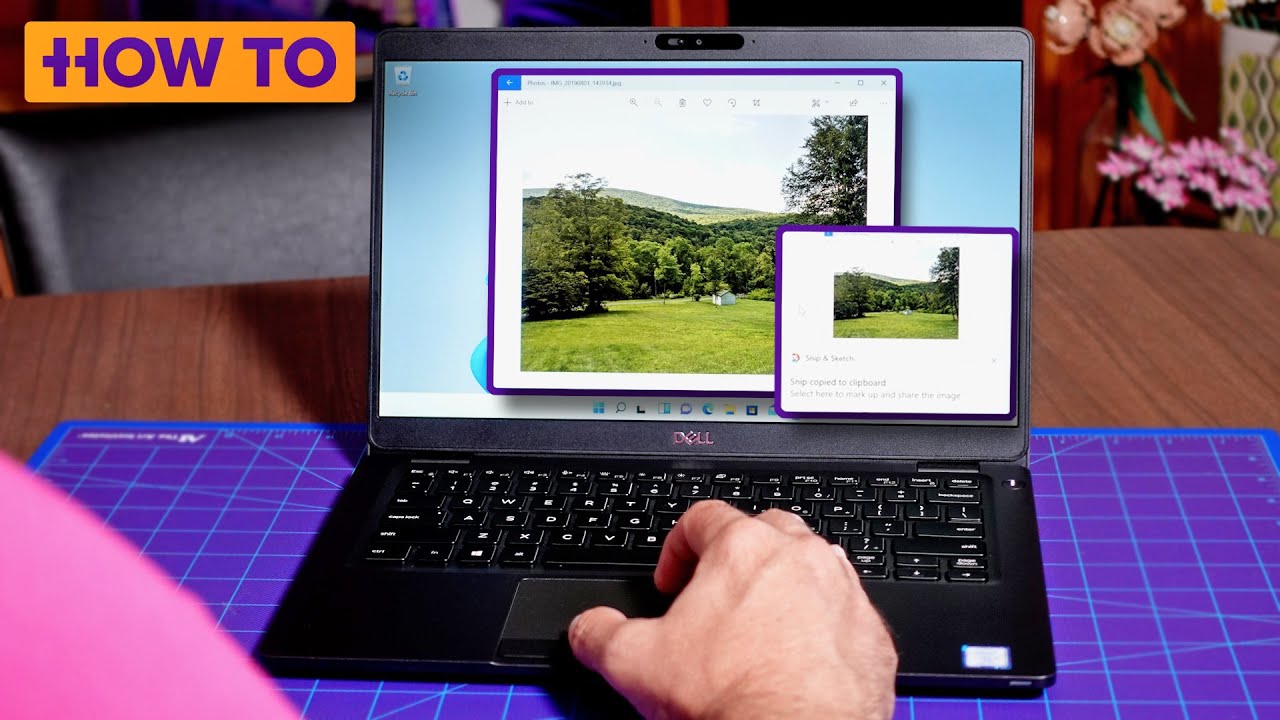
4. The Windows Key + Shift + S Shortcut:
For more granular control over the captured area, Windows 11 provides the Windows key + Shift + S shortcut. This combination activates a selection tool, allowing users to draw a rectangle around the desired portion of the screen. The captured image is then copied to the clipboard, ready for pasting into other applications.
5. The Snipping Tool:
The Snipping Tool, a built-in Windows application, offers a comprehensive set of features for capturing and editing screenshots. Users can choose from different modes, including free-form snipping, rectangular snipping, window snipping, and full-screen snipping. Additionally, the Snipping Tool allows for basic editing functionalities, such as adding annotations, highlighting, and cropping.
6. The Xbox Game Bar:
For capturing gameplay moments, Windows 11 offers the Xbox Game Bar, a dedicated interface for enhancing the gaming experience. The Game Bar includes a screenshot capture functionality, allowing users to quickly capture their gaming exploits.
7. Third-Party Screenshot Tools:
Beyond the built-in options, a plethora of third-party screenshot tools are available, offering advanced features such as scheduling, video recording, scrolling screenshots, and image editing capabilities. These tools cater to specific needs and provide greater flexibility for capturing and manipulating digital content.
Understanding the Differences: Choosing the Right Method
The choice of screenshot method depends on the specific context and desired outcome. Consider the following factors:
- Area of Capture: If you need to capture the entire screen, the Print Screen key, Windows key + Print Screen, or full-screen snipping in the Snipping Tool are suitable options. For specific windows or applications, the Alt+Print Screen combination or window snipping in the Snipping Tool are recommended.
- Editing Requirements: If basic editing functionalities, such as cropping, highlighting, or adding annotations, are required, the Snipping Tool or dedicated screenshot tools provide the necessary features.
- Saving Location: The Windows key + Print Screen shortcut automatically saves screenshots to the Pictures folder. The Print Screen key, Alt+Print Screen, and selection tool require pasting the captured image into an application.
- Additional Features: Third-party tools often offer advanced features, such as video recording, scrolling screenshots, and automated scheduling, that may be beneficial for specific use cases.
Mastering the Basics: Step-by-Step Instructions
To ensure seamless screenshot capture, follow these step-by-step instructions for each method:
1. Print Screen Key:
- Open the window or application you wish to capture.
- Press the Print Screen (PrtScn) key on your keyboard.
- Open an image editing program (e.g., Paint, Photoshop) or a document.
- Press Ctrl+V to paste the captured screenshot.
2. Alt+Print Screen Key Combination:
- Open the window or application you wish to capture.
- Press and hold the Alt key.
- Press the Print Screen (PrtScn) key.
- Open an image editing program or a document.
- Press Ctrl+V to paste the captured screenshot.
3. Windows Key + Print Screen Shortcut:
- Open the window or application you wish to capture.
- Press the Windows key and the Print Screen key simultaneously.
- The screenshot will be automatically saved as a PNG file in the Pictures folder.
4. Windows Key + Shift + S Shortcut:
- Open the window or application you wish to capture.
- Press the Windows key, Shift key, and S key simultaneously.
- A selection tool will appear.
- Draw a rectangle around the desired portion of the screen.
- The captured image will be copied to the clipboard.
- Open an image editing program or a document.
- Press Ctrl+V to paste the captured screenshot.
5. Snipping Tool:
- Open the Snipping Tool by searching for it in the Start menu.
- Select the desired snipping mode (free-form, rectangular, window, or full-screen).
- Use the mouse to select the area you want to capture.
- The captured image will appear in the Snipping Tool window.
- You can edit the screenshot using the available tools (e.g., pen, highlighter, eraser).
- Save the screenshot by clicking the "Save Snip" button.
6. Xbox Game Bar:
- While playing a game, press the Windows key + G to open the Xbox Game Bar.
- Click the "Capture" icon (a camera symbol).
- Choose the "Screenshot" option.
- The screenshot will be automatically saved in the "Captures" folder within the Xbox Game Bar.
7. Third-Party Screenshot Tools:
- Download and install a third-party screenshot tool (e.g., Lightshot, ShareX, Snagit).
- Follow the specific instructions provided by the tool to capture screenshots.
Frequently Asked Questions: Addressing Common Queries
1. What is the best screenshot method for capturing a specific window?
For capturing a single window, the Alt+Print Screen key combination or the window snipping mode in the Snipping Tool are recommended. These methods isolate the selected window, excluding other elements on the screen.
2. How do I edit a screenshot after capturing it?
The Snipping Tool offers basic editing functionalities, such as adding annotations, highlighting, and cropping. For more advanced editing capabilities, you can use image editing programs like Paint, Photoshop, or dedicated screenshot tools.
3. Where are my screenshots saved?
The Windows key + Print Screen shortcut automatically saves screenshots in the Pictures folder. The Print Screen key, Alt+Print Screen, and selection tool require pasting the captured image into an application. The Snipping Tool allows you to choose the save location.
4. Can I capture a scrolling webpage as a single screenshot?
While the standard screenshot methods capture only the visible portion of the screen, some third-party tools offer scrolling screenshot capabilities, allowing you to capture entire webpages, even those that extend beyond the screen.
5. How do I capture a video of my screen?
Windows 11 offers the Xbox Game Bar, which includes a screen recording feature. Additionally, numerous third-party tools specialize in screen recording, providing advanced features and customization options.
Tips for Taking Effective Screenshots: Enhancing Your Capture
- Ensure Clear Visibility: Before capturing a screenshot, ensure that the desired content is clearly visible on the screen. Adjust window sizes, minimize unnecessary elements, and optimize the display settings for optimal clarity.
- Utilize Annotation Tools: If you need to highlight specific elements or add explanations, use annotation tools in the Snipping Tool or dedicated screenshot tools. These features can enhance clarity and communication.
- Consider File Format: PNG is a lossless format that preserves image quality, making it suitable for screenshots. JPEG is a compressed format that can reduce file size but may result in some image quality loss.
- Organize Your Screenshots: Create dedicated folders for screenshots to ensure easy access and organization. You can categorize screenshots based on projects, topics, or date.
- Explore Third-Party Tools: For advanced features such as scheduling, video recording, or scrolling screenshots, consider exploring third-party screenshot tools that cater to specific needs.
Conclusion: Empowering Yourself with Screenshot Expertise
Screenshots have become an indispensable tool in the digital world, offering a simple and effective way to capture, share, and document digital content. By mastering the various methods available on Windows 11, users can effectively capture screenshots tailored to their specific needs. From basic captures to advanced editing and video recording, the options available empower users to document, communicate, and preserve their digital experiences with ease.
![Top 5 Ways to Take Screenshots On Windows 11 [Guide]](https://itechhacks.com/wp-content/uploads/2021/06/Take-a-Screenshot-On-Windows-11.jpg)
/medfr04491-56aa11ba5f9b58b7d000b184.jpg)
![Top 5 Ways to Take Screenshots On Windows 11 [Guide]](https://itechhacks.com/wp-content/uploads/2021/06/PrtSc-Windows-1920x828.jpg)

Closure
Thus, we hope this article has provided valuable insights into Capturing Your Digital World: A Comprehensive Guide to Taking Screenshots on Windows 11. We hope you find this article informative and beneficial. See you in our next article!