Accessing the BIOS/UEFI Setup on Windows 11: A Comprehensive Guide
Related Articles: Accessing the BIOS/UEFI Setup on Windows 11: A Comprehensive Guide
Introduction
With enthusiasm, let’s navigate through the intriguing topic related to Accessing the BIOS/UEFI Setup on Windows 11: A Comprehensive Guide. Let’s weave interesting information and offer fresh perspectives to the readers.
Table of Content
Accessing the BIOS/UEFI Setup on Windows 11: A Comprehensive Guide
The BIOS, or Basic Input/Output System, is a fundamental part of any computer’s operation. It’s the first program that runs when a computer boots up, responsible for initializing hardware components and providing a platform for the operating system to load. While modern systems primarily use UEFI (Unified Extensible Firmware Interface), the term "BIOS" remains commonly used to refer to the system setup interface.
Accessing the BIOS/UEFI setup is crucial for various tasks, including:
- Changing boot order: This allows you to select the primary boot device, such as a hard drive, USB drive, or network connection. This is essential for installing new operating systems, troubleshooting boot issues, or booting from alternative devices.
- Configuring hardware settings: The BIOS/UEFI setup provides access to settings for components like the hard drive, network card, and CPU. This allows you to adjust performance, enable or disable specific features, and manage hardware configurations.
- Overclocking: Some BIOS/UEFI setups allow advanced users to overclock their CPU or other components, potentially increasing performance.
- Security settings: The BIOS/UEFI setup offers options to configure security features like password protection, secure boot, and Trusted Platform Module (TPM).
Methods for Accessing the BIOS/UEFI Setup in Windows 11:
There are two primary methods to access the BIOS/UEFI setup in Windows 11:
1. Using the Boot Menu:
- Restart the computer: Power off the computer completely and then turn it back on.
- Press the designated key: During the initial boot process, a message typically appears on the screen instructing you to press a specific key to access the boot menu. This key is often F2, F10, F12, Delete, Esc, or a combination of keys. The specific key varies depending on the computer manufacturer.
- Navigate the boot menu: The boot menu allows you to select a boot device. Look for an option labeled "BIOS Setup," "UEFI Setup," or similar.
- Enter the BIOS/UEFI setup: Selecting this option will take you to the BIOS/UEFI setup interface.
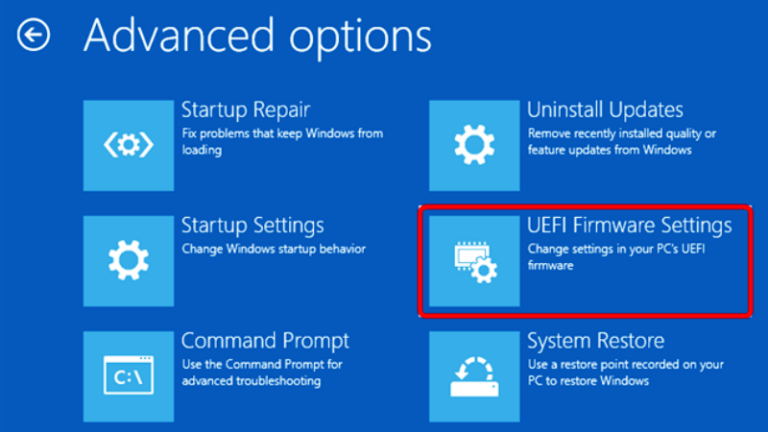
2. Accessing the BIOS/UEFI Setup Through Windows 11 Settings:
- Open Settings: Press the Windows key + I on your keyboard to open the Windows Settings app.
- Navigate to Recovery: Click on "System," then "Recovery."
- Choose Advanced Startup: Under the "Recovery" section, click on "Advanced Startup."
- Select Restart Now: Click on the "Restart Now" button.
- Choose Troubleshoot: After restarting, select "Troubleshoot."
- Select Advanced Options: Click on "Advanced Options."
- Select UEFI Firmware Settings: Choose the "UEFI Firmware Settings" option.
- Restart: Click on the "Restart" button to enter the BIOS/UEFI setup.
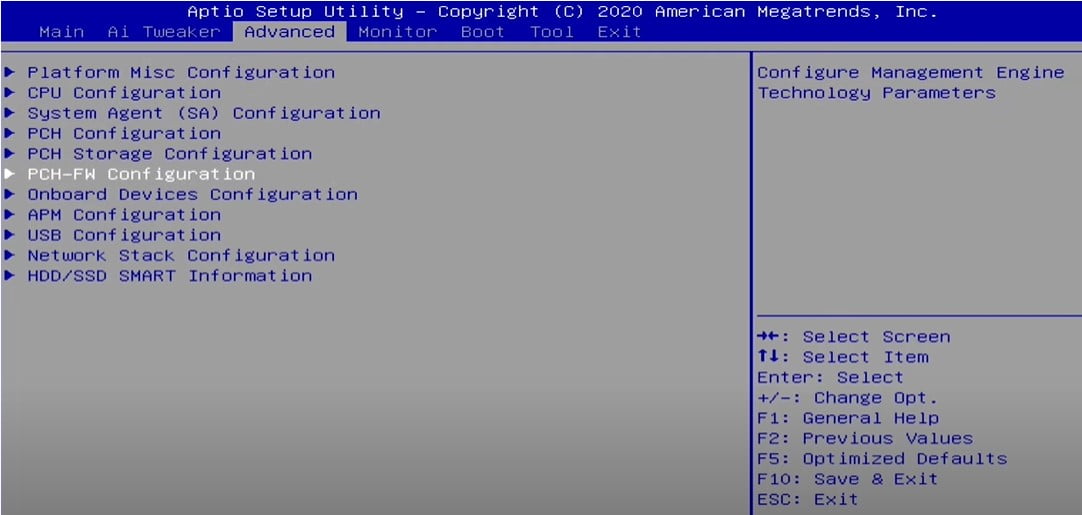
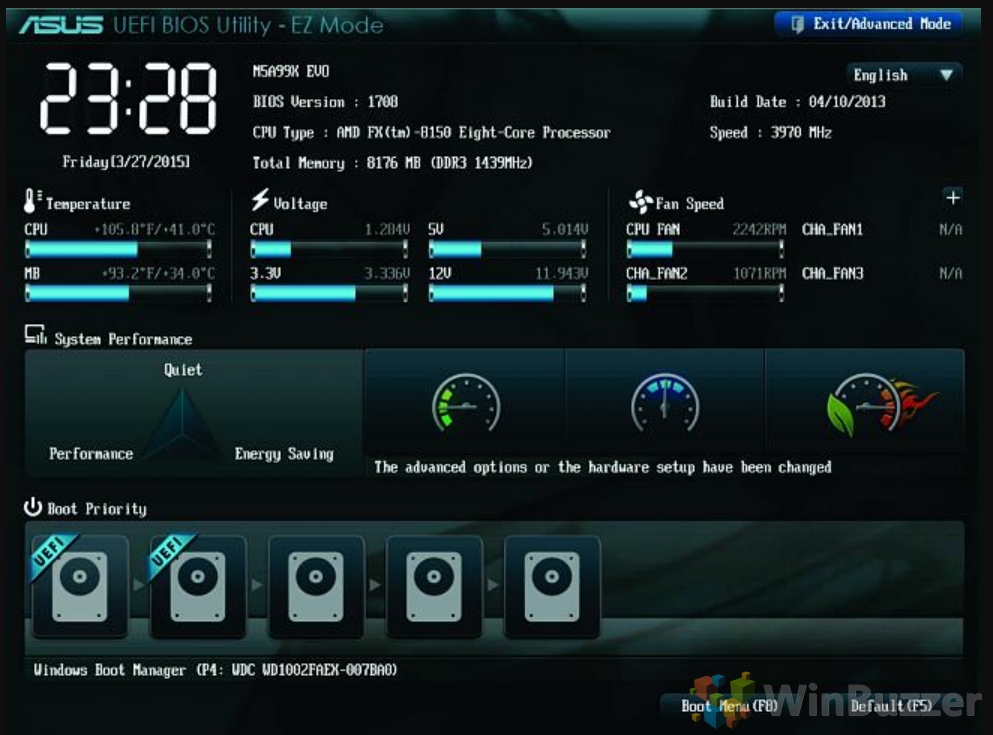
Navigating the BIOS/UEFI Setup:
The BIOS/UEFI setup interface can vary significantly depending on the computer manufacturer and motherboard. However, most interfaces share common elements:
- Main Menu: The main menu displays the primary sections or categories within the BIOS/UEFI setup.
- Navigation: Use the arrow keys, Page Up/Page Down, and Enter key to navigate through menus and options.
- Saving and Exiting: Once you’ve made changes, it’s essential to save them before exiting. Look for options like "Save & Exit," "Save Changes," or "Exit & Save Changes."
- Discarding Changes: If you do not want to save changes, look for options like "Discard Changes," "Exit Without Saving," or "Cancel."
Understanding BIOS/UEFI Terminology:
- Boot Order: Defines the sequence in which the system attempts to boot from different devices.
- Boot Mode: Determines whether the system boots in legacy BIOS mode or UEFI mode.
- Secure Boot: A security feature that ensures only trusted operating systems and drivers can boot.
- Trusted Platform Module (TPM): A hardware security module that enhances system security.
- XMP Profile: A setting that allows you to automatically load optimized performance settings for your RAM.
- SATA Mode: Determines the mode in which the hard drive is connected to the motherboard.
- Overclocking: Allows you to increase the clock speed of the CPU, potentially improving performance.
- Fan Control: Allows you to adjust the speed of system fans.
Important Considerations:
- Read the documentation: Before making any changes, consult the documentation for your specific computer model or motherboard. This will provide information about the available options and their implications.
- Backup important data: Before making significant changes, especially to boot settings, back up your important data to prevent data loss.
- Be cautious with overclocking: Overclocking can lead to system instability and damage if not done correctly. Proceed with caution and only if you understand the risks.
- Reset to defaults: If you’re unsure about a setting or if changes cause issues, reset the BIOS/UEFI to factory defaults. This can often resolve problems.
FAQs:
Q: What is the difference between BIOS and UEFI?
A: BIOS is the older system, while UEFI is a newer and more advanced standard. UEFI offers improved security, faster boot times, and support for larger hard drives.
Q: What happens if I change the boot order?
A: Changing the boot order determines which device the system attempts to boot from first. If you change the boot order to a USB drive, for example, the system will attempt to boot from the USB drive before the hard drive.
Q: Can I change the boot order without entering the BIOS/UEFI setup?
A: Yes, some operating systems, including Windows 11, offer options to change the boot order through the system settings.
Q: What if I forget the BIOS/UEFI password?
A: If you forget the BIOS/UEFI password, you may need to contact the computer manufacturer or motherboard manufacturer for assistance. They may be able to provide a way to reset the password.
Q: Can I damage my computer by entering the BIOS/UEFI setup?
A: Entering the BIOS/UEFI setup itself is generally safe. However, making incorrect changes to settings can lead to issues. Always consult the documentation and proceed with caution.
Tips:
- Use the keyboard shortcuts: Familiarize yourself with the keyboard shortcuts for navigating the BIOS/UEFI setup. This will make it easier to move between menus and options.
- Take screenshots: If you need to refer back to settings, take screenshots of the BIOS/UEFI setup screens for reference.
- Don’t be afraid to experiment: The BIOS/UEFI setup is a powerful tool. Experiment with different settings to see how they affect your system. However, always proceed with caution and back up your data before making significant changes.
Conclusion:
Accessing the BIOS/UEFI setup is an essential skill for any computer user. It allows you to customize your system’s boot order, configure hardware settings, and manage security features. By understanding the methods for accessing the BIOS/UEFI setup and navigating its interface, you can gain greater control over your computer’s operation and ensure optimal performance. Remember to proceed with caution, consult documentation, and back up your data before making any significant changes.
![How To Access BIOS Settings/Enter UEFI On Windows 11? Best Guide [2022] - YouTube](https://i.ytimg.com/vi/QmgRGCEquaU/maxresdefault.jpg)


Closure
Thus, we hope this article has provided valuable insights into Accessing the BIOS/UEFI Setup on Windows 11: A Comprehensive Guide. We appreciate your attention to our article. See you in our next article!