A Comprehensive Guide to Erasing a Windows Laptop Before Selling
Related Articles: A Comprehensive Guide to Erasing a Windows Laptop Before Selling
Introduction
With enthusiasm, let’s navigate through the intriguing topic related to A Comprehensive Guide to Erasing a Windows Laptop Before Selling. Let’s weave interesting information and offer fresh perspectives to the readers.
Table of Content
A Comprehensive Guide to Erasing a Windows Laptop Before Selling

Selling a used Windows laptop requires more than just wiping the hard drive clean. It involves a meticulous process that ensures the removal of all personal data and system configurations, leaving the device in a pristine state for its new owner. This guide delves into the intricacies of erasing a Windows laptop, providing a step-by-step approach to safeguard your privacy and prepare the device for resale.
The Importance of Thorough Erasure
Selling a laptop without proper data erasure poses significant security risks. Personal information, including passwords, financial details, and sensitive documents, can be easily accessed by the new owner if not completely removed. This vulnerability can lead to identity theft, financial fraud, and other serious consequences. Furthermore, leaving behind system files and applications can hinder the new user’s experience, causing conflicts and performance issues.
Preparing for the Erasure Process
Before commencing the erasure process, it is crucial to take the following preparatory steps:
- Back Up Essential Data: Ensure all important files, documents, and applications are backed up to an external drive, cloud storage, or another secure location. This step safeguards valuable data from accidental deletion during the erasure process.
- Deactivate Accounts: Sign out of all online accounts, including email, social media, and cloud services. Deactivating these accounts ensures that the new owner cannot access your personal data through these platforms.
- Remove Removable Media: Eject any external drives, USB sticks, or SD cards connected to the laptop. These devices may contain sensitive data that needs to be backed up and removed before the erasure process.
Methods for Erasing a Windows Laptop
Several methods can be employed to erase a Windows laptop, each offering varying levels of security and complexity. The most effective and widely recommended methods are discussed below:
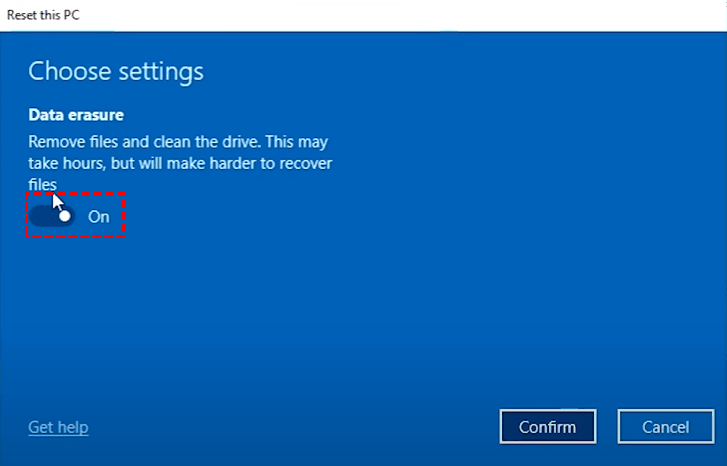
1. Using Windows’ Built-in Reset Feature:
This method is the simplest and most accessible option, suitable for users with basic technical knowledge. Windows offers a built-in "Reset this PC" feature that allows users to restore the device to its factory settings.
Steps:
- Open "Settings" by pressing the Windows key + I.
- Navigate to "Update & Security" > "Recovery."
- Click "Reset this PC."
- Choose the desired reset option: "Keep my files" or "Remove everything."
- Follow the on-screen instructions to complete the reset process.
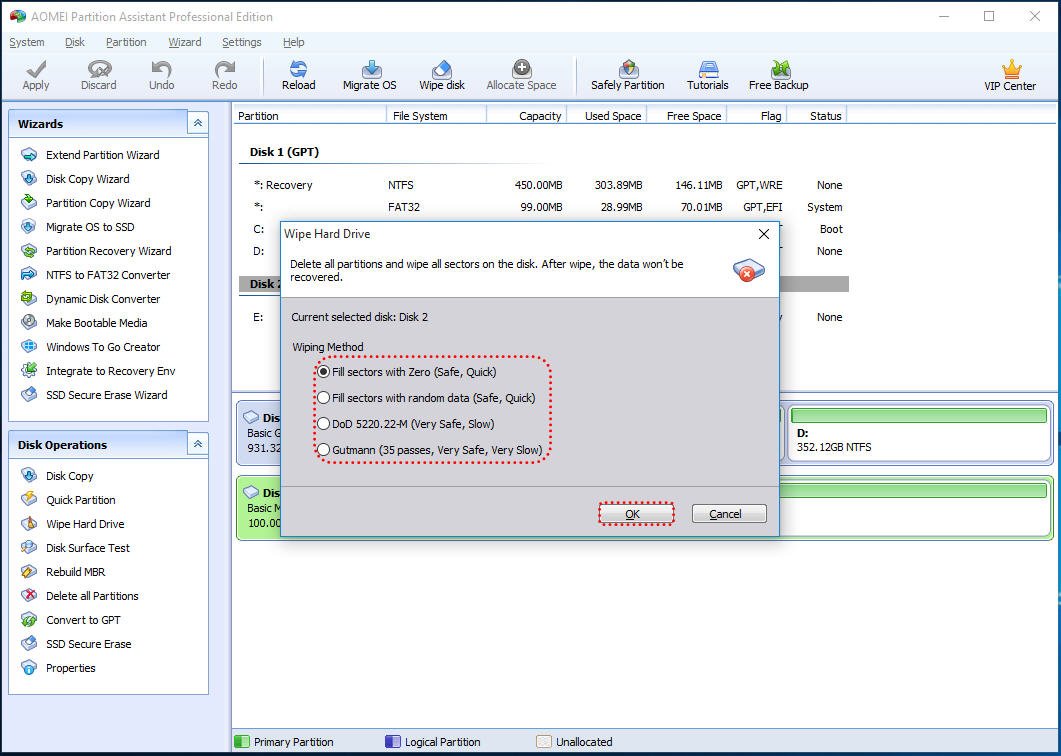
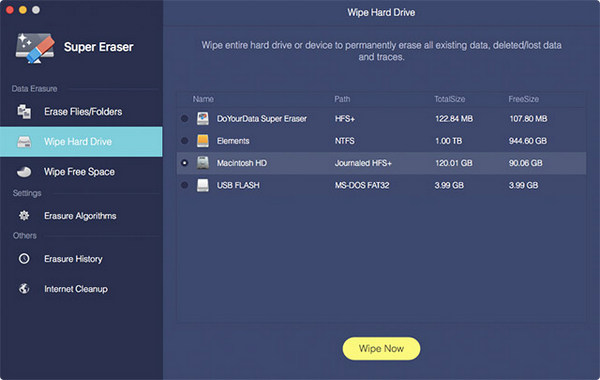
2. Employing a Third-Party Data Erasure Tool:
For enhanced security and complete data removal, consider using a dedicated data erasure tool. These tools employ advanced algorithms to overwrite the hard drive multiple times, ensuring that the original data is unrecoverable.
Popular Data Erasure Tools:
- DBAN (Darik’s Boot and Nuke): A free and open-source tool that offers various erasure methods, including DoD 5220.22-M and Gutmann.
- Paragon Hard Disk Manager: A paid software that provides a comprehensive range of disk management tools, including data erasure.
- Blancco: A professional-grade data erasure tool used by organizations and government agencies to ensure complete data destruction.
3. Performing a Clean Installation of Windows:
This method involves reinstalling Windows from scratch, effectively erasing all existing data and system configurations.
Steps:
- Download the latest Windows installation media from Microsoft’s website.
- Boot the laptop from the installation media.
- Follow the on-screen instructions to install Windows.
- During the installation process, choose the option to format the hard drive, ensuring that all data is erased.
4. Physically Destroying the Hard Drive:
For the highest level of security, consider physically destroying the hard drive. This method guarantees that the data is irrecoverable.
Methods for Hard Drive Destruction:
- Drilling: Using a drill to puncture the hard drive platters.
- Hammering: Smashing the hard drive with a hammer.
- Degaussing: Using a degausser to erase the magnetic data on the hard drive.
Tips for Ensuring Thorough Erasure:
- Use a Secure Erasure Method: Opt for methods that overwrite the hard drive multiple times, such as DoD 5220.22-M or Gutmann.
- Verify the Erasure Process: After using a data erasure tool, verify that the hard drive has been successfully erased.
- Consider Professional Data Destruction: For sensitive data, consider hiring a professional data destruction service to ensure complete and secure data erasure.
FAQs About Erasing a Windows Laptop Before Selling:
Q: What is the difference between "Keep my files" and "Remove everything" options in the Windows Reset feature?
A: The "Keep my files" option preserves your personal files but removes system files and settings, restoring the laptop to its factory state. The "Remove everything" option erases all data, including personal files, from the hard drive.
Q: Is it necessary to physically destroy the hard drive?
A: While not always necessary, physically destroying the hard drive offers the highest level of security, ensuring that the data is irrecoverable.
Q: Can I use a simple file deletion to erase data from my laptop?
A: No, simple file deletion does not permanently erase data. Deleted files remain on the hard drive until overwritten by new data.
Q: What if I forget to back up my important files?
A: If you forget to back up your files, you can try recovering them using data recovery software. However, this is not guaranteed, and the recovered data may be corrupted.
Q: Can I sell my laptop without erasing the hard drive?
A: It is strongly discouraged to sell a laptop without erasing the hard drive. Doing so exposes your personal information to the new owner and may lead to security breaches.
Conclusion:
Thoroughly erasing a Windows laptop before selling is essential for protecting your privacy and ensuring a smooth transition for the new owner. By following the steps outlined in this guide, you can effectively remove all personal data and system configurations, leaving the device in a clean and secure state. Whether you choose to use Windows’ built-in reset feature, a third-party data erasure tool, or physically destroy the hard drive, ensure you employ a method that guarantees complete data removal. Remember, protecting your data is paramount, and taking the necessary steps to erase your laptop before selling is crucial for safeguarding your privacy and avoiding potential security risks.


Closure
Thus, we hope this article has provided valuable insights into A Comprehensive Guide to Erasing a Windows Laptop Before Selling. We appreciate your attention to our article. See you in our next article!